Like many Amiga owners, I have been plagued by many power supply failures over the years. I’m just lucky that I’m the proud owner of 5 Amigas, allowing for some spares in my modest collection of beige machines.
With only one decent PSU left in stock, I decided to do the right thing and resurrect a “bricked” PSU brick with a Mean Well RT-50B power supply. These power supplies a popular restomod for a failed Amiga PSU (also the RT-65B) and is just the right size to slip into the mighty brick with only a little “trimming” required – great for the purists in the Amiga community.
This project was a bit of a steep learning curve so I’ve put together this article to help my fellow Amiga owners also looking to take on this little project.
Disclaimer: I’m not an electrician – this was my first PSU project and very much a learning experience. Please let me know if I’m talking sh*t at any point or if you have something that needs adding/editing in the comments below.
What’s the difference between the Mean Well RT-50B and RT-65B
See below for a break down of each power supply output and the physical dimensions
PSU |
RT-50B |
RT-65B |
| 5v Amps | 4 Amp | 5 Amp |
| 12v Amps | 2.0 Amp | 2.8 Amp |
| -12v Amps | 0.5 Amp | 0.5 Amp |
| Output Power | 50w | 65w |
| Dimensions mm | 99 x 97 x 36 | 129 x 98 x 36 |
| Weight | 410g | 440 g |
| Price * | £17.78 | £20.48 |
It doesn’t take a genius to work out that the number in the power supply model number references the total power output. Whilst the RT-50 is rated slightly lower (15w less than the 65, it’s nearly 30mm shorter, making it much easier to squeeze into the Amiga power supply case.
* Prices as of 3/7/20 these are exc. VAT and shipping
What does the original Amiga power supply output?
| PSU Type | Part number | +5V current | +12V current | -12V current | Combined Watt Power Rating |
| A500 type 1 | 312503-02 | 2.5 Amp | 1.0 Amp | 0.1 Amp | 25.7 Watts |
| A500 type 2 | 312503-03 | 4.5 Amp | 1.0 Amp | 0.1 Amp | 35.7 Watts |
| A6000 A1200 | 391029-02 | 3.0 Amp | 0.5 Amp | 0.1 Amp | 22.2 Watts |
| A600 A1200 | 391029-03 | 3.0 Amp | 0.5A | 0.1 Amp | 22.2 Watts |
How much power does an Amiga consume?
Even with beefy hardware added to the A1200 (68060 and some hard drives), you’ll be lucky to see over 3 amps 5v an 0.08A 12v for a combined total of around 15 watts.
For reference, a stock Amiga 500 pulls around 2A (5v) 10W – Amiga 600 1.7A (5v) 8.5w and a stock A1200 1.4A (5v) 7w. So unless you really need the extra power the RT-50B is more than enough for most Amiga hardware.
Why did I use the RT-50 over the RT-65
With my humble Amiga 1200 sporting a CF hard drive, GOTEK, external floppy and an additional 8MB of ram, it’ll still only be pulling 10 – 15 watts at its peak. The RT-50B is more than capable and also 30mm shorter than the RT065, allowing much more room for activities in the already cramped A500 power supply case.
Where to buy
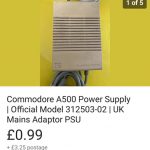
£1 plus postage?! Bargain!
If you’re looking for a spare Amiga PSU or don’t want to be without your current brick then I’d suggest heading over to Ebay, You should be able to pick up a doner PSU for anything from a couple of quid up to around £25 for a working model.
For the power supply, I sourced mine from Powersupplies online for less than £22 delivered to my door – https://www.powersuppliesonline.co.uk/rt-50b-50w-5v-4a-triple-output-switching-power-supply.html
What else do I need?
I’d recommend that at least you’ll need the following
- Multimeter
- Electrical connectors / soldering iron/shrinkwrap – depending on how you’d like to connect the wires
- A small/medium Philips screwdriver
- Dremel tool/cutters
Getting started
Firstly, ensure your PSU is not plugged to the main or Amiga, flip it over and remove the screws. You may need to use a thin screen driver down in the recessed holes. Once open CAREFULLY split open the PSU case.
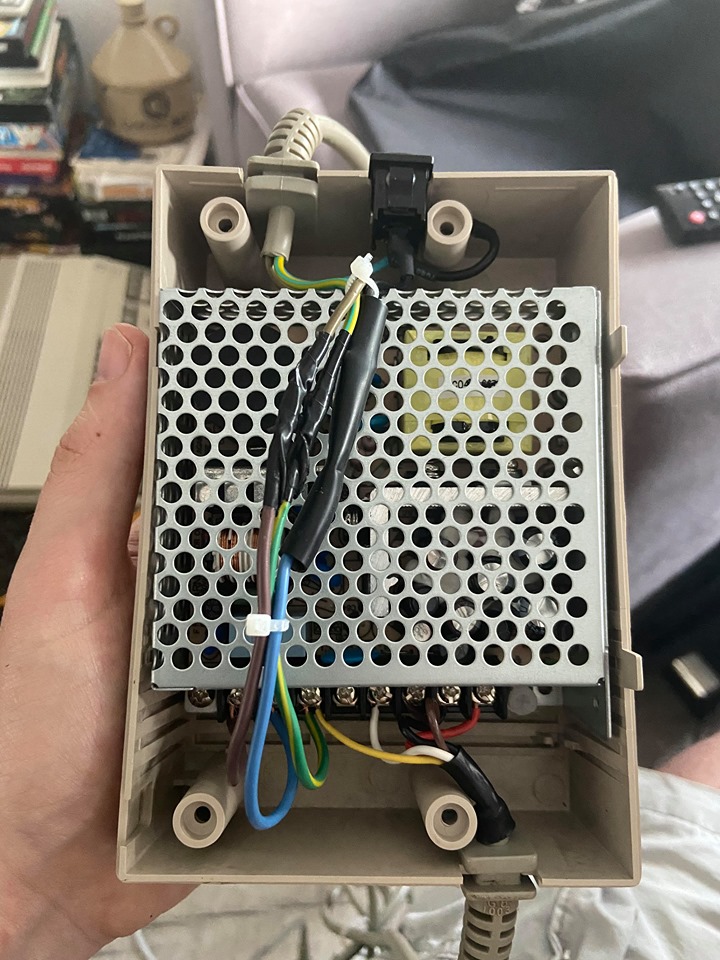
WARNING! The power supply may still retain some electrical current. TREAT IT AS LIVE. Carefully snip all the wires to and from the power supply with insulated wire cutters then carefully remove the guts of the until using an insulated tool. I used the same wirecutters to grab onto one of the plates and lift it out. I can’t stress how careful enough how careful you should be.
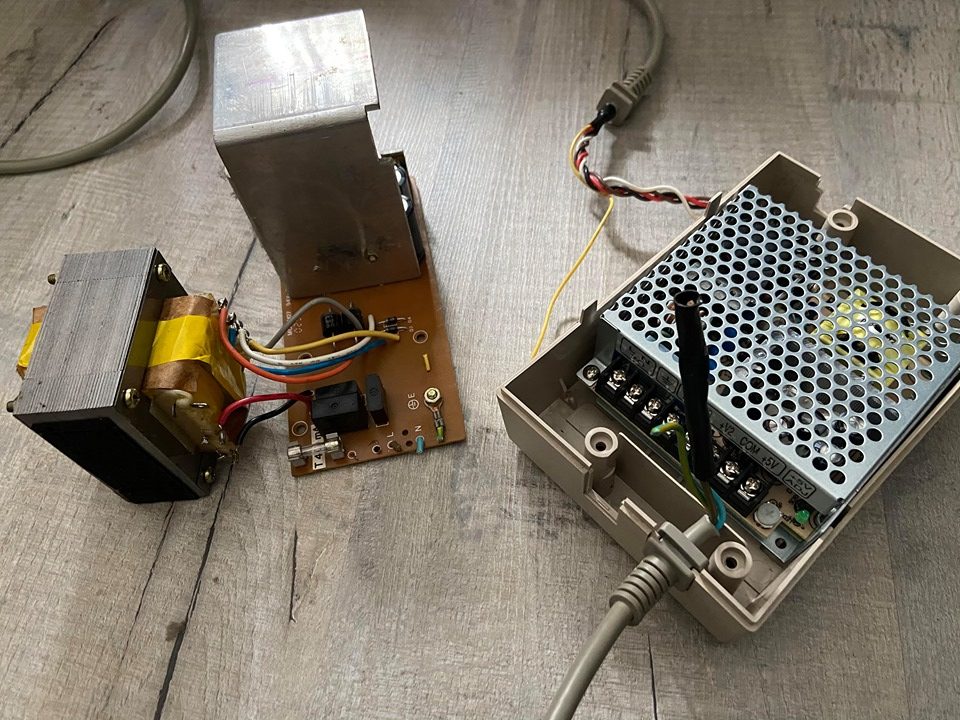
Original PSU removed from the casing. Meanwell unit places for comparison
Check the Pins
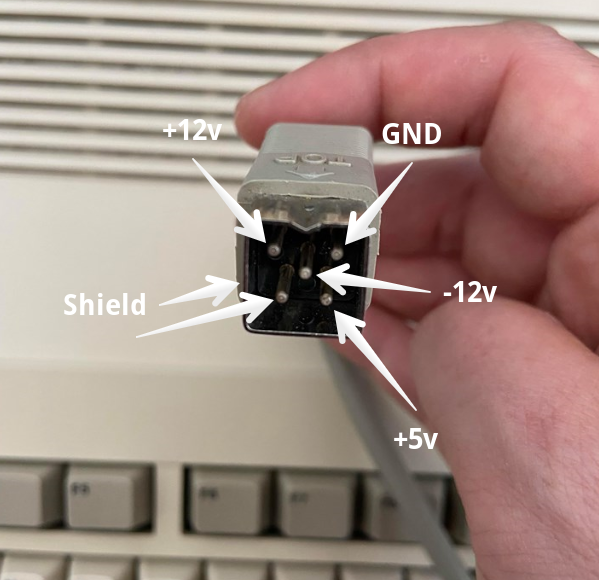
Using the multimeter’s continuity feature I traced and recorded power cable wires to the Amiga, recording them on the back of an Amazon packing envelope. Simply strip the ends of the wire and carefully test each pin and record the cable colour. We’ve seen lots of combinations of colours so DO NOT just go by the colours on some random Facebook post. This is why you need a multimeter
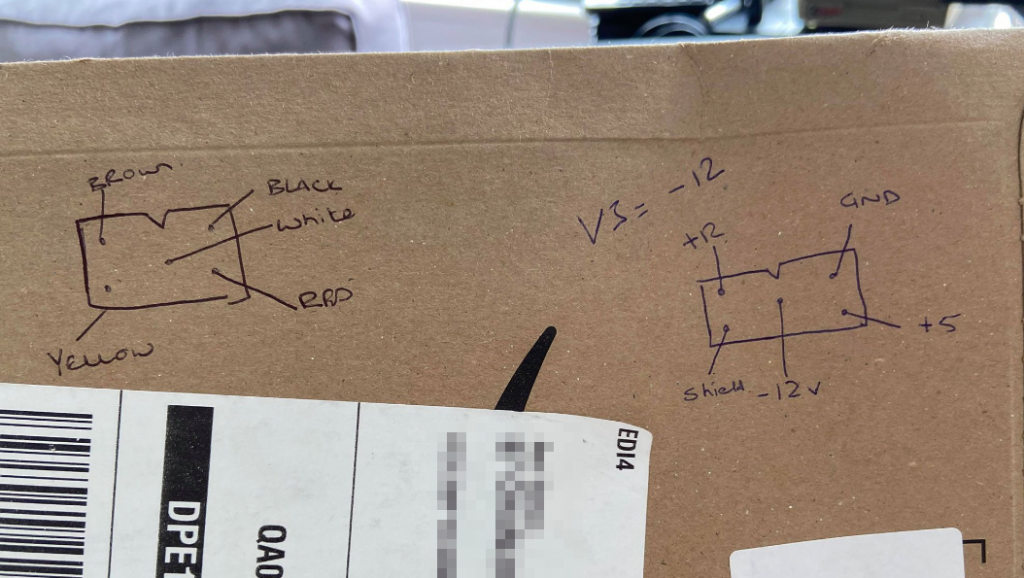
Recycling Amazon packages!
Amiga connector pins
To help you record your cables to pin colour use the following diagram. Strangely, this PSU didn’t have a shield pin cable.
Test the power supply
Next, I connected the MeanWell and tested it on my spare Amiga 500 before going any further. Using the pin test above, I connected the cables as below. Note that your cable colours to the Amiga might be different – you MUST identify these or you risk damaging your precious Amiga.
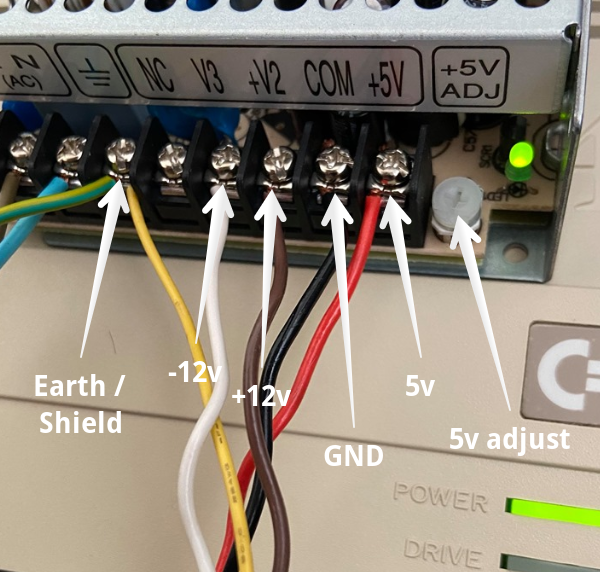
WE HAVE LIFE! Tested on my spare A500 – at the point, I wasn’t brave enough to use my beloved A1200
This worked perfectly on my less than perfect A500. Next, I prepared the case.
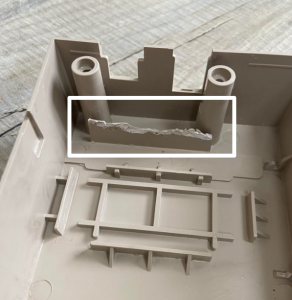
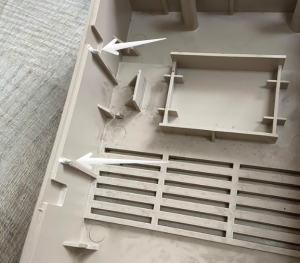
Trim the case
As below – to help give some clearance to the AC power in cables I hacked trimmed away some plastic at the top of the shell. I also trimmed the four plastic risers at the sides. These fouled against the sides of the MeanWell unit, stopping the case from closing fully. A Dremel would have made a much cleaner job of this.
Fitting time
There’s a wide number of ways that you can fit the MeanWell power supply into the PSU case. We’ve seen people run the AC cables underneath and even move the AC cables to the other side of the case so they don’t need extending. I opted to keep it looking original from the outside and extend the cables.
I wired the switch into the LIVE (brown) AC in cable, soldered extension wires taken from an old kettle lead and wrapped them in electrical tape. I then used the iron to shrink the tape. Now, my soldering skills are shocking and I wasn’t really happy with the results.
Whilst this worked OK – I wasn’t happy with the results
For my next attempt, I hacked out my shoddy soldering in favour of electrical block connectors. This will allow the PSU to be swapped out in the future with minimal fuss.
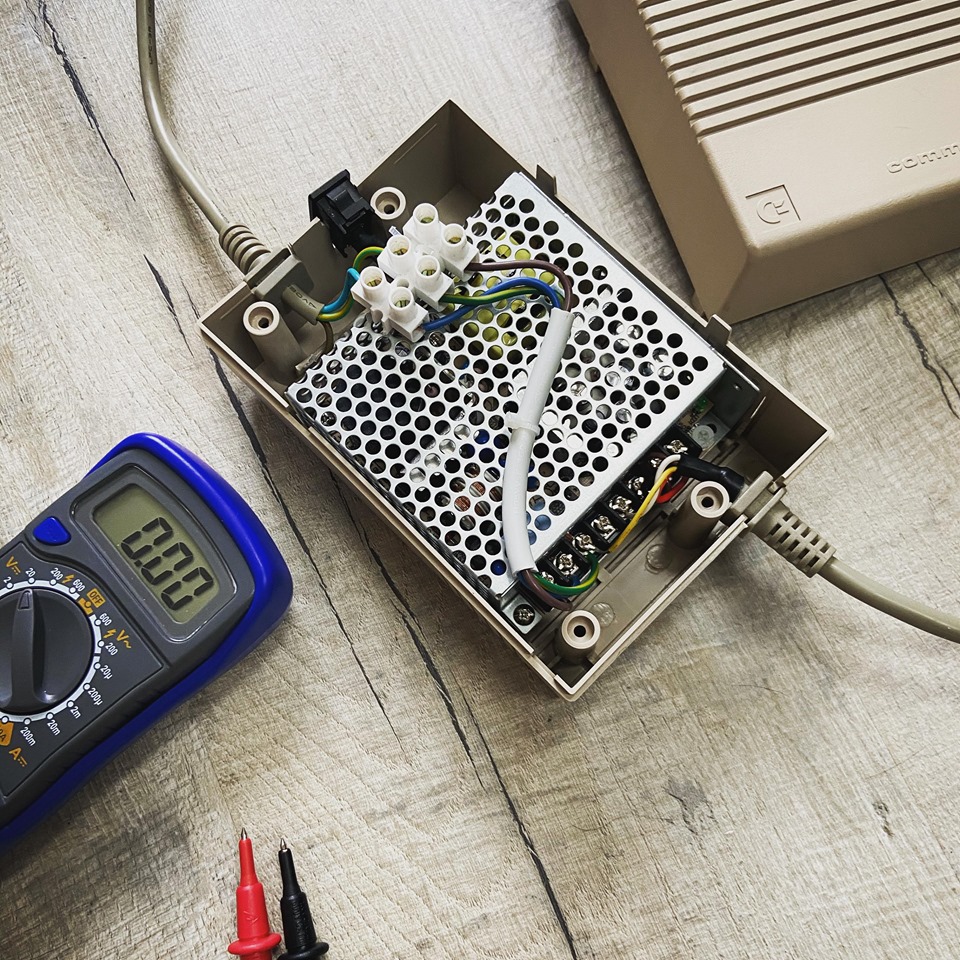
A much cleaner installation IMO
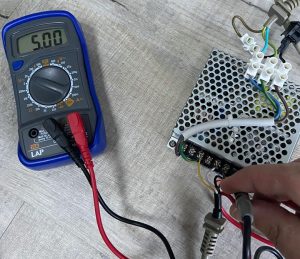
Testing the outputs
Before having the bollocks to test this on my cherished Amiga 1200, I took the opportunity to test the voltages on the output of the MeanWell RT-50B. See the results below.
Note: testing on a live PSU has its risks. Please PLEASE be careful.
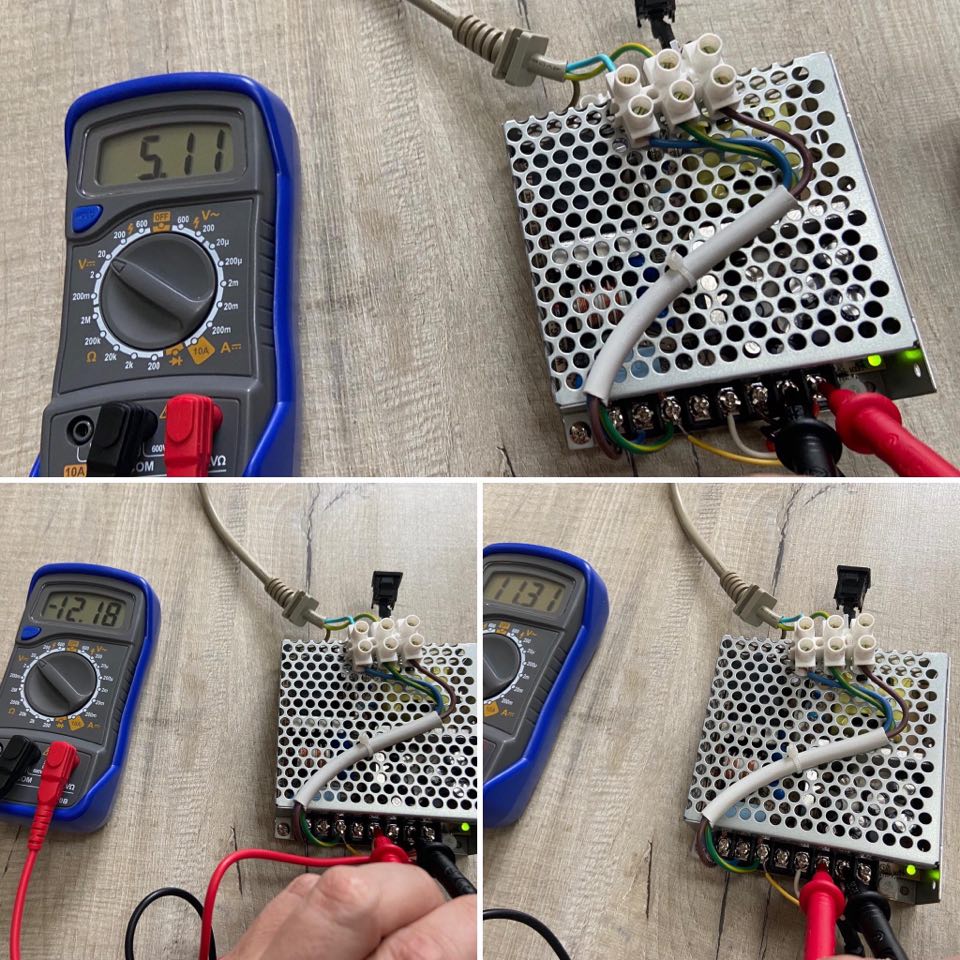
Did I mention you needed a multimeter?!
Note the values:
- 5v = 5.11
- 12v = 11.31
- -12v = -12.18
As above, the voltages were a little out (I’m talking to you 5v). You’ll see what a difference this can make below.
Amiga 1200 testing
At this point, I was “happy” that the PSU as working as expected and connected it to my beautiful Amiga 1200. Upon booting into Workbench, I noticed some rolling video interference on the display.
I’m using an OSSC, so I tried a number of things to see if it was the power supply at fault. I plugged the Scart directly into my LG 15Hz panel and also moved the power supply to a “clean” socket. None of these resolved the issue, at this point I thought my new MeanWell PSU could be faulty. I reached out to the amazing Amiga Facebook community.
I adjusted the 5v output buy turning the 5v adjustment dial counter-clockwise until it read a glorious 5v dead. I tested it again and voila!

Perfect output to my OSSC
The final product
With everything working perfectly the power supply was again completely disassembled. The case was given a soapy bath, a little soak with some Barry White and candles. After a dry down with a couple of microfibre cloths it was like new.
Here she is. From the outside, you wouldn’t be able to tell that it’s hiding a new and improved MeanWell RT-50B that should power my Amigas for many years to come
Final thoughts
This whole project was a learning experience. Mistakes were made but I’m very happy with the outcome.
For a very small outlay, it’s quite a feeling to know that I’ve managed to resurrect a piece of Amiga hardware that I would have normally disposed of in a heartbeat.
Let’s hear from you.
What do you think of my mini Amiga power supply project? Have I made any silly mistakes? How could this be improved? I’m more than happy to revisit this project in the future with your thoughts and advice. Let us know in the comments below.
Hi there, this is really excellent stuff. I am going to follow your steps and hopefully achieve the same success as you did. You provide a tonne of really useful information here too and this has hopefully answered my questions to you which I still want to ask in case you can elaborate a little more. So here goes. I have an accelerator on the way that has a 060 fitted to it, would the meanwell RT-50B be enough to power this card do you think? I have read that my forthcoming accelerator can run just fine using an old A500 power supply the type 2 version so I am assuming that a meanwell RTB-50B should be fine. The only other things I will be using will be CF card via IDE and I guess power for the onboard cooling fan on the accelerator. Any advice or info you could give me on the matter would be very much appreciated. One more thing, I could not leave my email address properly below because it wouldn’t let me type in lower case so just in case type my address in lower case if you are going to reply. Thanks for your time and effort to make this guide stuff like this really helps people like me 🙂 Thanks Gerry
Hi Gerry
TBH this the RT-50B should be more than enough to run your 060. The A500 type2 puts out 15W less than the Mean Well unit so you should have more than enough overhead to run your extras. Remember that a stock 1200 only uses 7w to begin with.
Good luck and let us know how you get on.
Cheers Karl
Hi Karl, well D day is upon us and I have finally decided to transplant the meanwell RT-50B I bought into the old dead power supply I also bought on (off ebay). My case I have noticed is different from your case. I might get away with actually not having to modify it at all. So for it appears my meanwell well kind of wedge in there without any negative effects on the old Amiga PSU casing. My casing differs from yours as it has the switchhole on the top half of the casing as opposed to the bottom half alongside the mains wiring. I have individual block connectors also to do the job and I have made sure the wiring on the 5 pins side all matches up colour wise so lets see how I get on! Watch this space!!
Hi Gerry
Glad you here you’re about there. I think some PSU cases are quite different depending on the model. I think I need to investigate this further so I can help people get the right case.
Good luck and be sure to let us know how you get on!
Cheers Karl
Jeez totally forgot to get back to you about this! The whole thing was an amazing success!! see here https://eab.abime.net/showthread.php?t=103781&highlight=meanwell
One question, now I’m trying to stick a Fast ATA MKII in there, does the Meanwell RT-50 still have enough juice? I’d like to think so, but currently can’t get it working, but it would be nice to get that ruled out. Anyways thank you once again and this information from you was so helpful.
How is this working out – is it reliable? I too have no experience working with PSUs and am a bit nervous. If you use the electrical block connectors, it is basically a solder-free installation?
Hi Ed – yes it is.
I soldered the wires in my first attempt but it was a bit of a mess. Using the block connectors it is very much a solder-free project. You could use the crimp connectors but I have never really been a fan of these.
Let me know how you get on and if you need any further help or advise.
Cheers Karl
I followed your guide this weekend just gone. I have 6 Amiga power supplies, all of which differ some way or another in dimensions. However, I did find ONE original Amiga A600 PSU (Part Number 391029-02) that didn’t require ANY modifications at all. The RT-65B did not fit in the lower half of the casing due to the screw posts. It did, however, fit in the top half of the case. The screw posts in the upper case aren’t as wide and it fits (just) in between them and is actually supported by the posts in the lower casing once re-assembled.
I have posted photos and my description at https://www.facebook.com/groups/CommodoreAmiga/permalink/10157675231739157/
Thanks Chris – I’ve replied to your comment. I’ll get digging and see if we can find the differences between them so people know what modifications are needed for specific PSUs.
Was your 5v voltage out as much as mine was?
Great! – Wanted to explain how to “upgrade” a Commodore PSU with MeanWell parts. Then I found this link…
Thanks a lot.
Thank you for this article, it worked! 🙂
Cheers, Jan
Hi Jan
No problem at all! It’s a great little project 🙂
This is an excellent resource. Thanks so much for sharing. I was going to buy a new replacement psu, but really want to refurb my Amiga as much as possible myself and this enabled me. I ordered the recommended Meanwell unit and followed this guide. My newly-acquired A1200 is very happy – so am I. Thanks again. Onto recapping it myself next!
Great Guild for us mere mortals…..Lucky for me you made two psu`s and i bought one off Ebay….Great service…thanks mate
Thanks for your order Mark. They are a great unit and a worthy upgrade.
Cheers for the kind words and feedback. Unlike many other Amiga stores – I put my customers first and get my orders out ASAP 🙂
Hi…. I’m back…..been using my Goliath uprated psu with my PiStorm A500+ with prelude remake…untill it died…so I thought I would use the meanwell on the A500…..right…with the 5v set to 5v the A500 boots..but no PiStorm hdmi….if u adjust the. 5v to 5.08v in get PiStorm rtg via HDMI….but the PiStorm RTG screen flashes on/off every few minutes…..any ideas ?
Could you power 2 amigas at the same time with the RT50 or RT65?
In so case, any idea on how one would hook that up.
How do you make a “switch” that Connects/Breaks the 4 signals (5V , +12V, -12V, GND) ?
You could by simply wiring two Amiga cables to the output terminals. However, switching each one individually would be a ballache.
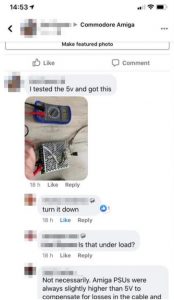
Hi there. I’ve no idea if these comments are still checked, but I’m in need of some help so I’m hoping so! I’ve wired up the RT50B to replace my A600 brick. I’ve tested the 5v output and it’s registering 6.4v. It’s not plugged into anything (other than the wall of course!). Is this normal when it’s not under load? I don’t dare plug it in to my Amiga to check for fear of killing it. Thanks for any help you can provide.
Hi Mark
I would knock it down to 5v using the adjustment screw. The ones I have built were around the 5.5v but it looks like yours was just a little higher.
Thanks – but that’s with the adjuster turned right down!
I’d return that unit if I were you mate
“Strangely, this PSU didn’t have a shield pin cable.”
The yellow thin cable is not part of the main cable, but in the PSU end, it is factory soldered to shield “web” end surrounding all the other wires.
By opening the Amiga end PSU connector and rolling the web to form a wire, it is possible to have shield pin connected all the way. This will require cutting and resoldering the maincable to make shield web to reach longer, since the factory has cut it too short to reach Amiga PSU connector pin.
The Amiga PSU connector shield itself however is more tricky to solder to web, but I did not bother since the risk of melting the other wire insulation when trying to make connector shield to connect shield web. Shield pin and psushield case seem to have have contuinity in Amiga motherboard PSU connector.
I did not have to dremel anything or continue any cables and I used STP-100. The Meanwell needs to be placed accurately in the middle so there will be space for side knobs too and I suggest closing the side first where it leans more.
Pardon my terminology, I’m not native english speaker.
Hi, I just checked the datasheet from the power supply at https://docs.rs-online.com/75ee/0900766b81621ffe.pdf
It seems the RD-50B provides 5 V/24 V, while the RD-50A provides the needed 5 V/12 V.
Are you sure you got the B-version?
Bye,
Oliver
Thank you for documenting your work. I am thinking of doing a similar swaparoo. I am curious why you didn’t put the meanwell the other way around? Then the low voltage output would be routed over the supply instead. Wouldn’t that be slightly safer? There’s probably a good reason, I am no expert.