Written by Adam Laidlaw “Homer0ne” – A loyal member of NAG
The information in this guide can be found on other sites but here it will be in one place! I know quite a few of you are knowledgeable when it comes to most of this, but I will write this as if you know nothing! At time of writing, Emu68 is still work in progress so expect bugs, Also, if you blow anything up, it’s not my fault!!
- Retro32’s note. As with with all our articles, they are in a constant state of revision as new things pop up and processes change. Please let us know in the comments if you spot anything wrong or that may have changed since publishing. We will be putting together a video of the entire process very soon.
This guide assumes some knowledge of Workbench / WinUAE. For those really struggling we may look at releasing an SD card image and / or an SD card for sale from our store.
3 Minute PiStorm
If you just want to test Emu68 or just run it as a CPU without RTG and hard drives then this is for you!
- Go to https://github.com/michalsc/Emu68/releases/tag/nightly and download the zip file (the one I downloaded was, Emu-pistorm-20220127-c2c4ad.zip)
- Format your SD card to FAT32
- Extract the zip file, then copy and paste the contents to the root of the SD card
- Get your preferred kickstart ROM and copy it to the root of the SD card rename it to i.e. kick.rom
- Find config.txt and open look for initramfs at the bottom of the file and make sure that the ROM name is same as you kick start i.e. initramfs kick.rom
- Insert the SD card into the Pi then power up the Amiga. that’s it. You’ll be greeted by the kick start screen (as per the ROM you used above).
Full EMU68 Setup
This guide will help you setup Hard Drives and RTG. I used a 32gb SD card for this. First, we need to partition the SD Card. This will depend on how many Drives you want. This guide will show you how to do 3 Amiga drives
Note: I followed these instructions http://tech.webit.nu/pistorm-preparing-the-sd-card-for-emu68/
- Run CMD / Command Prompt or PowerShell as Administrator
- Type: Diskpart
- Type: list disk [This will bring up a list of drives in your computer 0 should be you C drive so DON’T select this!!!]
- Type: select disk x (x= the disk number of your SD card – the easiest way to tell is to match the size)
- Type: clean [this will wipe the / clean the entire SD card]
Now its time to create the partitions. The size isn’t the issue here (especially it you plan on using Workbench 3.2. Just make sure they will fit on the SD card.
- Type: Cre part pri size=200
- Type: Cre part pri size=500 id=76
- Type: Cre part pri size=200 id=76
- Type: Cre part pri id=76
You will notice we have just created 4 partitions even though we are having 3 Amiga drives. The first partition which will be 200MB is for the Emu68 software. You don’t have to go with the sizes here you can make what size you want. The last command (cre part pri=76) will create a partition with the remainder of the memory card
- Type: Sel part 1
- Type: Assign
- Type: Exit
You should have had some popups asking you to format the drives you created. ONLY format the 200MB drive as FAT32. You can do this via My Computer or Windows Disk Manager but remember to format FAT32.
- Head on over to https://github.com/michalsc/Emu68/releases/tag/nightly and download the zip file (the one I downloaded was, Emu-pistorm-20220127-c2c4ad.zip)
- Unzip the file and copy the contents of the folder to the root of the SD card
- Get your preferred kickstart rom and copy it to the root of the SD card rename it to i.e. kick.rom
- Find config.txt and open look for initramfs at the bottom of the file and make sure the ROM is same as you kick start i.e. initramfs kick.rom
- Insert the SD card into the Pi then powerup the Amiga
- You should now be greeted with the kickstart screen
Installing Workbench using the Amiga
- You will need the install disk (adf if using goteck) for your OS. Boot it up.
- Once booted navigate to HDToolBox go to it’s information box click on Icon tab
- Where is says SCSI_DEVICE_NAME=scsi.device change it to SCSI_DEVICE_NAME=brcm-sdhc.device then save
- Run HDToolBox you will get a list of 4 drives IGNORE disk 0
- Click on disk 1 and then click on partition drive. It will try and partition it into two partitions, delete one and expand the other to the whole drive and at the bottom
- Change Partition device name to DH0 then repeat with drives 2 and 3 renaming them DH1 and DH2
- When complete you will see the list of drive with 1-3 stating changed highlight each drive and save changes once all 3 have been saved, exit HDToolBox
- Now reboot
Once reloaded you will see you new drives each will need to be formatted and named, when formatting chose quick format!
Workbench
There is two ways of doing this floppies/ADF files on the Amiga or connect your SD card to your PC and do it through WinUae. I did the Install via my gotek which is my DF1 (I made a list of which number was which ADF file and it was painless)
Installing Workbench using WinUAE
If doing it through WinUae then you have a bit of setting up to do. You can get the latest WinUAE build 4.9 from https://www.winuae.net/download/
Once installed to make life easier go to the WinUae icon and right click and open file location right click and select properties. Make sure you’re on the shortcut tab. Select Advanced and tick Run as Administrator and then OK, OK
Now run WinUae select yes to User Account Control, now setup your configuration, I configured similar to what the Pi is going to be
- 68040
- Full ECS
- Rom 3.2.1
- Ram 128MB Z3 Fast
But you can do as you need
- Once done click on CD & Hard drive on the left menu. Now your ready to add the Amiga drives on the SD to WinUae
- Click on Add Hard Drive this will open the Harddrive Settings box on the top option Hard drive click the arrow down you will get a list of drives. Look for the ones labelled Similar to 500MB Generic mass storage P#2, 2.0GB Generic mass storage P#3 and 26GB Generic mass storage P#4 (example pic to right)
- Add each of these to your config. Don’t for get to save your config
- You will need the install Workbench ADF (as CD is Write protected) for your OS.
- Boot it up. Once booted navigate to HDToolBox go to it’s information box click on Icon tab
- Where is says SCSI_DEVICE_NAME=scsi.device change it to SCSI_DEVICE_NAME=uaehf.device then save
- Run HDToolBox you will get a list of 4 drives IGNORE disk 0
- Click on disk 1 and then click on partition drive. It will try and partition it into two partitions, delete one and expand the other to the whole drive and at the bottom
- Change Partition device name to DH0 then repeat with drives 2 and 3 renaming them DH1 and DH2
- When complete you will see the list of drive with 1-3 stating changed highlight each drive and save changes once all 3 have been saved, exit HDToolBox
- Now reboot
- Once reloaded you will see you new drives each will need to be formatted and named, when formatting chose quick format!
If you are installing 3.2 via CD then don’t forget tick CDFS automount CD/DVD Drives and if using USB CD rom, plug it in and insert your Disc
- Start WinUae and it should auto boot from CD if so, go to the install folder and run installation.
- If for some reason it won’t boot from CD then boot from the install3.2 ADF and may need to run activate CD.
Installing EMU68 RTG
My source https://michalsc.github.io/Emu68/tutorials/P96_Setup.html
For this you will need a copy of Picasso96 or P96.
P96 is the latest version but you will need to Buy it from Individual Computers https://icomp.de/shop-icomp/en/news.html You will need to create an account before you can buy it. I used the copy from Aminet https://aminet.net/package/driver/video/Picasso96 Which so far works fine
Next you will need emu68-vc4.card from here these files should be small enough to fit a floppy disk/ADF but you will need to extract using LHA – Again, found on Aminet https://aminet.net/package/util/arc/lha.
- Connect a HDMI monitor to the Pi HDMI out
- If you have setup your SD card with WinUae then you can transfer files easier and faster than floppies.
- Unpack the Picasso when finished Put your SD card into the Amiga and boot up
- Run Picasso install choosing PicassoIV as your GFX card once finished move the emu68-vc4.card to the Picasso drawer found in you libs drawer which is hidden on your Workbench drive.
- Go to Workbench:Devs/Monitors/ find he PicassoIV icon, you can change this to Emu68-VC4 or leave it as is then right click and go to Information, on the Icon tab change boardtype to BOARDTYPE=Emu68-VC4
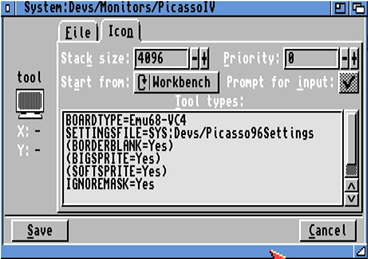
- Save then reboot – It will boot up as normal
- Go to workbench/prefs/Picasso96Mode
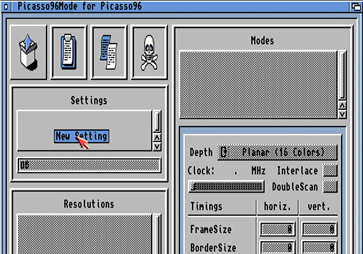
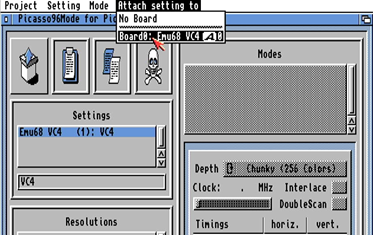
- Press and hold left mouse button on the box Icon, top left and drag to the settings box below then right click and go to Attach Setting to and select Board0: Emu68 VC4. You will notice there is no screen resolutions.
- Drag and drop like before on the box icon to the resolution box, this will allow you to create you first resolution, say 640×480
- Then you will then need to drag and drop as before the box icon to the modes box, this will create the mode 256colors 16khz 38hz i active
- Move your mouse down to scroll the screen and click on test. This will bring up a test screen on the monitor connected to the Pi
- If this is shows ok then move on to the next
- Again, drag and drop the box icon to the modes box this will create another 256colors 16khz 38hz i active but this time click the depth (256 colors) to change to HiColor, then you can repeat to create TrueColor.
- Then you can repeat the whole process to create new resolutions
- Once you have completed the Resolution process click on save
- Accept changes
- And yes, to reboot
If you get a popup “Please wait until all disk activity has ended”, Give it a few seconds and click Reboot now!
Once the Amiga has rebooted navigate to ScreenMode and open it should look something like

Set the resolution you wish and click Use and if ok your monitor connected to the Pi should now display your Workbench. Your Amiga’s RGB output will always be on, but should display a white screen
If you play a game which doesn’t use RTG it will automatically switch over to the Amiga’s RGB output. You will need a second display, a display with a second input or something the are several options
I also have the RGB2HDMI so use a HDIM switcher unpowered then just press a button to switch between outputs
Good Tutorial as always…
I appreciate your work very much.
Always in depth… Thank you !
Instructions worked well, except for one issue… The Red and Blue colors are swapped. When I turn up the red slider in Palette I get more blue and vise versa.
Thanks for the guide 🙂
For anyone following this, note the quick guide using the nightly build might result in you installing the code for running this on a pi and not a pistorm…. this might result in you going around in circles, circles and a few more circles 😉 Make sure you download the ones called pistorm and not raspi.
hello
how to acces a part of the sd card for transfert files to/from PC ?
Mount the Emu68 partition (partition 0) and edit 1 line in configuration file to enable read/write access in AmigaOS.
is a network (rj45 or wifi) option become ?
When creating the partitions on the SDcard, shouldn’t the third partition be size=2000 instead of size=200?
Otherwise an excellent guide, I got my setup running in a short time and without any problems!
I take the SDcard from my computer and use an USB reader to connect it to a PC running WinUAE. That’s working very conveniently for me, especially since I’m using a micro-SD extender to bring the SDcard to the outside of the Amiga.
I purchased an Amiga with Emu68 included. Is there a way to get to the pi command line to enable remote SSH services?
Someone might correct me but the Emu68 doesn’t use linux so SSH isn’t available. You’ll need the Mushashi classic software for that – as covered in this guide
If you are using a pi4, use brcm-emmc.device instead.
This looks promizing. I look forward to test it out. Got all the components now. Just wondering: this was the RTG explained. Will we see networking and AHI sound drivers available from the Pi also? That would be AWESOME!
HI
I have a problem with Amiga 2000 and RTG Piccolo card, with pi-storm 2K and Emu68 is not recognized with P96 and also EGS drivers. By mounting the accelerator A2630 instead it works. Could it be that Emu68 takes up all the zorro 2 ram space? If so, how can I do to free up space?
Thanks
Luigi
cre part pri size=1024 id=76 command hangs under Windows 11? This is what I am seeing:
DISKPART> cre part pri size=1024 id=76
Virtual Disk Service error:
The operation timed out.
DiskPart has referenced an object which is not up-to-date.
Refresh the object by using the RESCAN command.
If the problem persists exit DiskPart, then restart DiskPart or restart the
computer.
got the same error. but partition is created anyway and can be formated on amiga.
I have original os 3.1.4 disks
When I try to boot from the install floppy the system keeps asking for the disk that contains the Libs:icon.library
None the the disks appear to have this file on them, since I have tried them all.
I will try installing the os on the SD card using sinuses, but it should install from the real floppies on my A500 Rev 6 machine, right!
You are using the wrong kickstart then, try using the proper kickstart for your corresponding workbench.
My gotek, plugged into my A500 floppy port as df1 does not appear to be recognized.
Do I need to set something in my Emu68 files to get it to work?
How do I mount the EMU68 partition to see it in amiga workbench?
It only shows ‘Board0: VideoCore’ and doesn’t populate any resolutions. Also unable to add any by hand. It is broken.