** Update ** Thanks for all the feedback on the article. I’ve updated some of the autocorrected text issues with the networking section.
Whilst we’re in the golden age of Amiga hardware and software development, accessing all the potential in your lovely yellowed vintage computer can be quite tricky at the best of times. There are some great guides out there but as someone who has only recently got to grips with workbench, it’s quite a task to put together all the software components required to get a fully working setup on the PiStorm that allows you to enjoy all the features it offers.
In this guide, I’ll do my best to navigate you through the process of getting a fully sorted Raspberry OS and Workbench installation that includes all (hopefully) the standout features of PiStorm including the PiDisk, Networking and RTG.
Like many people out there I’m still new to all this, so this article (like my knowledge) will be a work in progress. Please feel free to comment or reach out if there’s something I’ve missed, got wrong, or if I’m just talking sh*t. With that covered, let’s crack on!
Note: This guide assumes you are able to set up a clean Workbench installation in WinUAE. I would recommend creating a partition of around 500MB. In this guide I used Workbench 3.2, I would recommend using 3.1 or later. Workbench ADF images / ROM files are available on the internet – but you’ll have to find them yourself.
This article also assumes you have a little technical ability. If I get enough requests, I would consider releasing an SD card image without the Amiga ROMs and HDF files. This would simply need you to set up the Wifi and do some tinkering with Workbench.
Hardware Installation
Let’s start with installing the hardware. I’ve already covered this in an earlier video as below – PLEASE PLEASE take care and don’t rush it. It can be a little tough to wiggle the CPU from the socket so gently does it!
Did I mention we sell PiStorms as both board only and complete kits? – click for Amiga PiStorm boards – We ship same or next day with worldwide shipping!
I would recommend a Sandisk 32GB MicroSD. These are available from Amazon – just make sure it’s sold and dispatched by Amazon as fake cards are sometimes supplied by 3rd party sellers.
Amazon Link – https://amzn.to/3BafyaC
Recommended Software
I’d recommend installing the following programs before starting the setup
- Winrar – allows the extraction of compressed Amiga applications in lha format https://www.rarlab.com/download.htm
- Putty SSH client – https://putty.org/
- WinSCP – Windows SFTP file manager – https://winscp.net/eng/index.php
If you’re using a Mac then you’ll need to find alternative software for this. If you have any recommended alternatives for macOS then please let me know.
Setting up Raspberry OS
Time to set your Pi up with Raspberry Pi OS. Luckily there is a simple installer that does all the hard work for you. There are a few things we need to achieve as below
- Raspberry Pi OS Lite install
- Setup Wifi
- Configure autologin
- Set display resolution
- Enable SSH
Download the installer from https://www.raspberrypi.org/software/
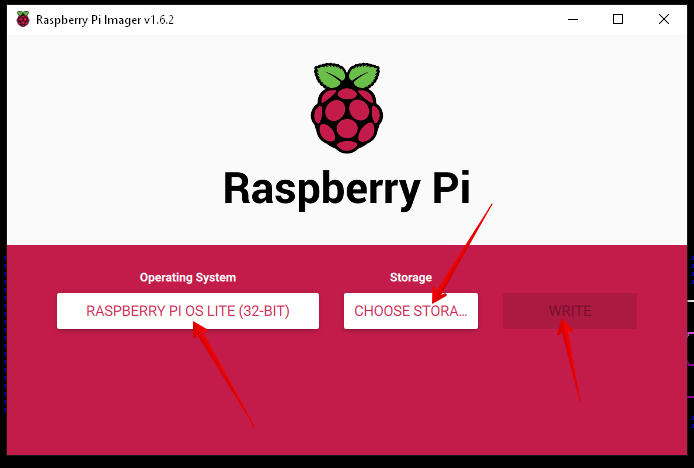
Launch the Raspberry Pi Imager software, chose Rasberry Pi OS (other) and select Raspberry PI OS Lite (32-bit). Then pop your SD card into your PC and click WRITE
Once completed. Pop the card into the Pi 3a+ on your PiStorm, connect a HDMI cable and USB keyboard – then turn your Amiga on. When it’s ready you’ll be at the Raspberry OS login.
The default login/credentials are pi / raspberry – you’ll need to log in.
Type sudo raspi-config
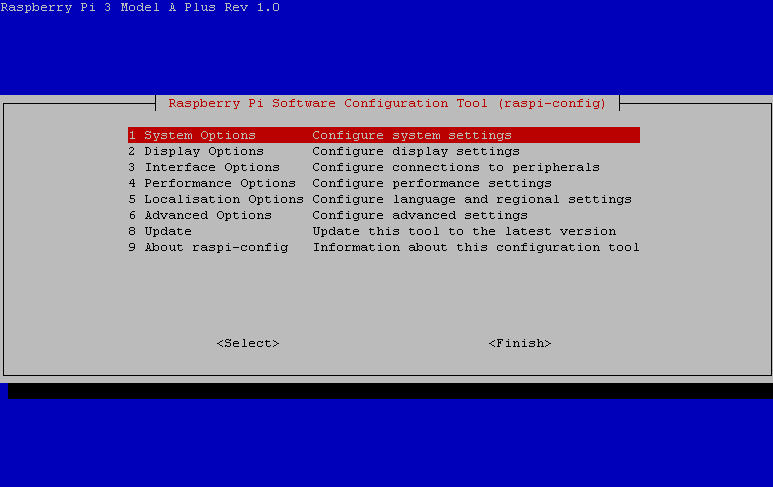
Complete the following setup –
- 1. > S1 – Wireless LAN – this will prompt for your Wireless SSID and security passphrase
- 1. > S4 – Boot / Autologin – select B2 console auto-login
- 2. > Display options – It’s recommended that you use a display resolution of 1280×720 16:9 – remember that the higher the resolution the harder the Pi will work to push around all those pixels
- 3. > P2 Enable SSH
- Click Finish > reboot the Pi
Hint – should you ever need to restart or shut down the pi then please use the following commands. It will enable the Pi and OS to shut down gracefully.
sudo reboot now
sudo shutdown now
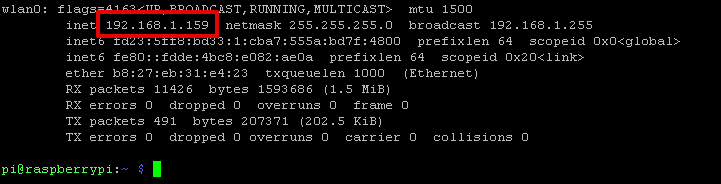
If (like me) you prefer to run commands via a remote SSH terminal then you’ll need the IP address of your Raspberry Pi. Type ifconfig from the terminal. I’d also recommend giving the Raspberry Pi a static IP address – this is usually using the MAC / IP binding settings in your router.
Accessing the terminal using SSH remotely
Rather than using a monitor directly connected to the Pi, you can access the Pi’s terminal remotely using Putty (link above).
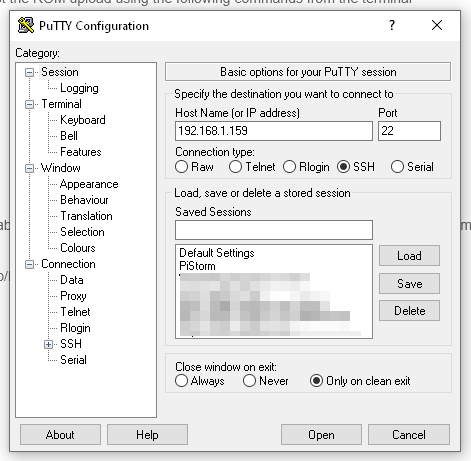
Simply open the Putty application and enter the PI’s IP address and ensure it’s set as Port 22 / SSH (as below).
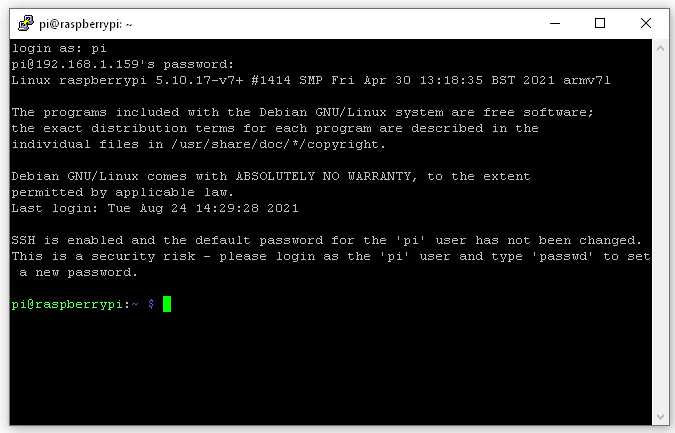
Click Open and then enter the login details pi / raspberry and you’re in
PiStorm Software Installation
With the above complete, it’s time to get on with installing the PiStorm software. The following commands have been taken from – https://github.com/captain-amygdala/pistorm these are liable to change as the software develops. * If at any point you are prompted for an install select Y (yes).
At the terminal prompt type the following commands:
- sudo apt-get update
- sudo apt-get install git libsdl2-dev
- git clone https://github.com/captain-amygdala/pistorm.git
- cd pistorm
- make
Now update the FPGA bitstream. Type:
- sudo apt-get install openocd
- ./flash.sh,
This will automatically detect your CPLD version and flash appropriately. If successful “Flashing successful!” will appear, if not it will fail with “Flashing failed” and nprog_log.txt will be created with more details.
Once completed – restart the Pi using the command sudo reboot now
When the Pi has restarted type
- cd pistorm
- sudo emulator
The display connected to the RGB port of the Amiga will now display the kickstart screen.
Upading the PiStorm Amiga ROM
A pretty impressive feature of the PiStorm is the ability to use a ROM file from the SD card. Copy a new ROM file to the PI using the steps below
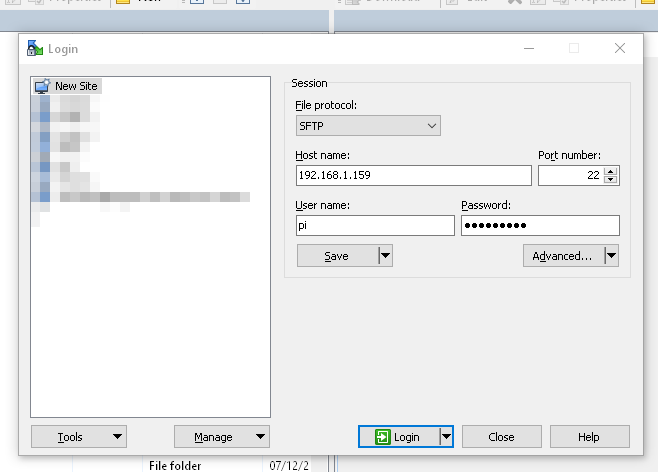
- Find the IP Address of your Pi (as above mine is 192.168.1.159)
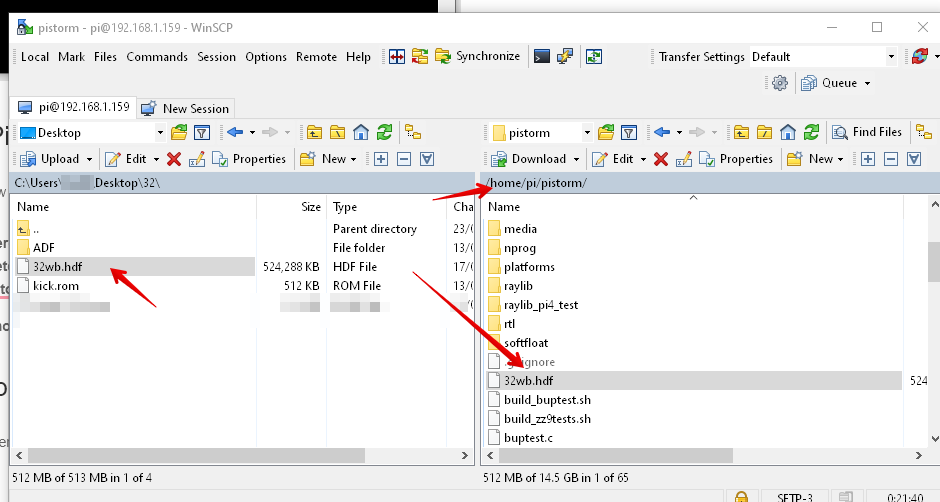
- Open WinSCP and enter the details of your IP and click login – example below
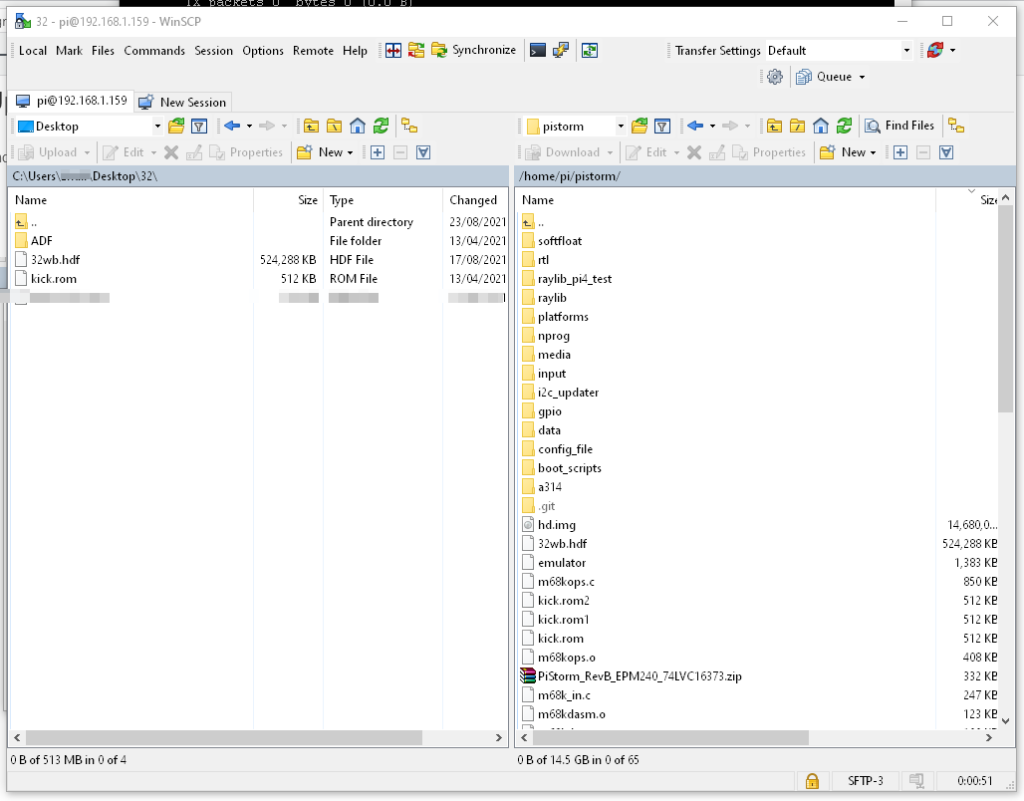
- Double click the pistorm folder and drag across your ROM file. Ensure it is named kick.rom (as below). As you can see below – I’ve got a small selection of ROM files that I’ve been testing. Simply rename them if you’d still like to keep alternatives on there.
You can now reboot the Pi using the command sudo reboot now then test the ROM upload using the following commands from the terminal
- cd pistorm
- sudo emulator
You should now have a shiny new kick ROM running on your Amiga.
Auto Starting the PiStorm software
Type the terminal commands below to configure PiStorm emulator to autostart run. Once enabled the Amiga will effectively “boot” without having to run the emulator command as above.
- wget https://raw.githubusercontent.com/beeanyew/pistorm/wip-crap/boot_scripts/pistorm.service
- sudo cp pistorm.service /etc/systemd/system
- sudo systemctl enable pistorm
Now reboot the pi (sudo reboot now) to ensure this is working
Upload your Workbench hard disk file
Now let’s upload the Amiga Workbench hard disk file. Simply copy the hdf file containing your Workbench setup to the pistorm folder. Depending on how large the file is, this may take some time over Wifi.
PiStorm configuration
Now we have the basics of the PiStorm setup, let’s get the configuration file updated.
Open the terminal either directly on the Pi or using Putty and type the following
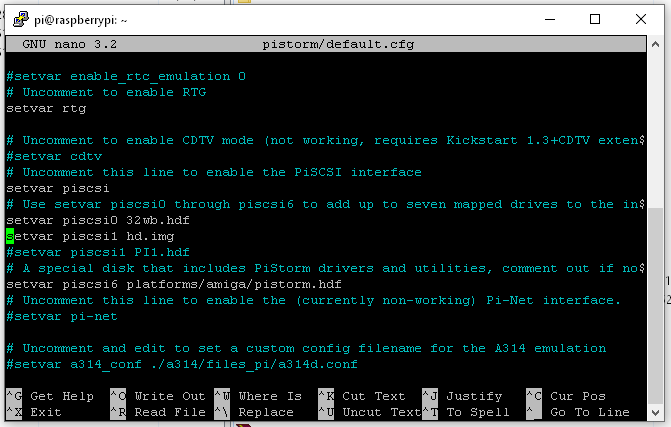
- sudo nano pistorm/default.cfg
- Change the CPU to 68030
- Remove the # (uncomment) before the line setvar RTG
- Remove the # (uncomment) before the line setvar piscsi
- Configure your Workbench hardisk as uploaded in the last setup i.e. setvar piscsi0 32wb.hdf
- Remove the # (uncomment) before the line setvar A314
- Press Ctrl s to save the file – Ctrl x to Exit
Additional hard disks can be configured using piscsi1 / piscsi2 etc
Once complete. Reboot the Pi using sudo reboot -now and you should boot directly to your Workbench install!! Well done. You got this far. Let’s get the A314 features set up!
Be aware that we have configured the PiStorm an 030, therefore it will require the Workbench MMULibs installing. These are available from Aminet – wait until you have the PiDisk set up the transfer / install them.
Setup the PiStorm A314 features
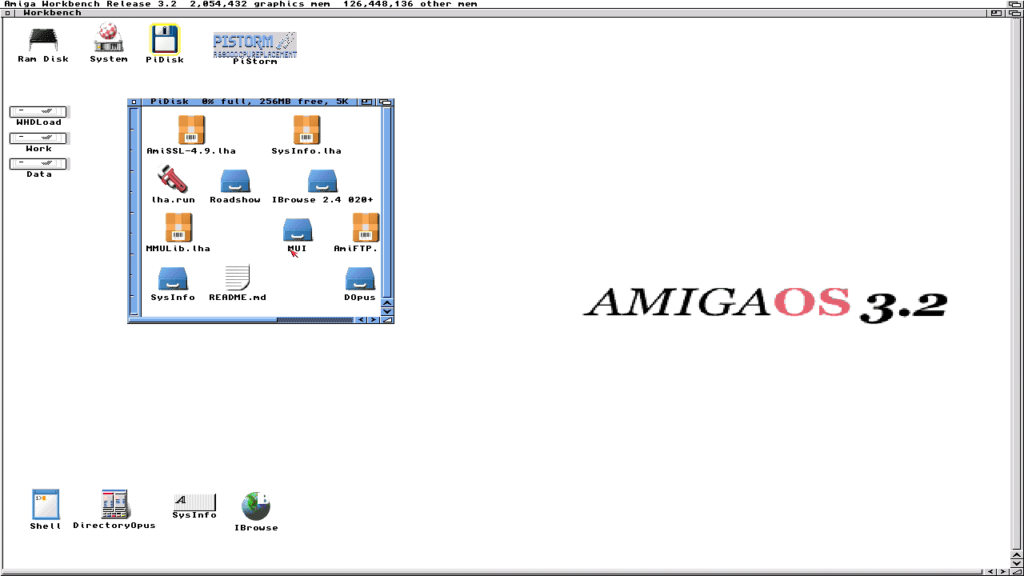
Now we’ve got your Workbench up and running you’ll notice that a wonderful new PiStorm icon appears on the Workbench screen. For those that looked closely at the screenshot above, it’s the pistorm.hdf file that’s included with the install. It contains the files required to get the A314 features such as RTG, PiDisk, and networking enabled.
![]()
This next set of instructions come from https://github.com/beeanyew/pistorm/tree/wip-crap/a314
Open the Amiga shell in Workbench and type (unlike the commands for the remote SSH – you can’t copy and paste). Make sure you double-check any Amiga shell commands before committing them.
copy PISTORM:a314/a314.device DEVS:
Reboot the Amiga (Ctrl A + A)
PiDisk
The PiDisk is folder on the PiStorm installation which is accessible both Amiga and Linux / Windows platforms. It makes transfering files to and from the Amiga a breeze. Follow the commands below to set this up
In the Amiga Shell type the following commands
- copy PISTORM:a314/a314fs L:
- type PISTORM:a314/a314fs-mountlist >> DEVS:Mountlist
You can now type mount PI0: into the shell to show the PiDisk
If you want to mount this disk at startup you can add the command to the startup sequence. Simply open Amiga shell and type ed s:startup-sequence – then type mount PI0: I added mine before the link LoadWB at the bottom of the file
Reboot the Amiga (Ctrl A + A) to confirm this is working
To access the PiDisk from Windows use WinSCP. The folder is /home/pistorm/data/a314-shared/
As you can see as below – I used it to transfer the Amiga apps

Amiga Software
Before continuing with the networking I’d suggest that you take the opportunity to install some of the following onto your Amiga if they have not been done so already. You can use the PiDisk to transfer them.
- DOpus
- IBrowse
- MUI (required for IBrowse) – link here
- Picasso96 (required for RTG)
- lha – instructions here
- MMULib
- Roadshow
Most of the above are available from Aminet – some you might need to pay for.
Optional things like AmiFTP & SysInfo might also be handy
Ethernet / Networking
Next, we’ll get the networking configuration set up.
From a Pi terminal type (As above I’d recommend using a remote SSH terminal so you can copy and paste. Typos WILL break things)
- sudo apt install python3-pip
- sudo pip3 install python-pytun
- sudo cp /home/pi/pistorm/a314/files_pi/eth-config-pi/tap0 /etc/network/interfaces.d/
- sudo iptables -t nat -A POSTROUTING -o wlan0 -j MASQUERADE
- sudo iptables -A FORWARD -i wlan0 -o tap0 -m state –state RELATED,ESTABLISHED -j ACCEPT
- sudo iptables -A FORWARD -i tap0 -o wlan0 -j ACCEPT
- Agree to the IPv4 question, You can pick any answer for IPv6
- sudo nano /etc/sysctl.conf
Uncomment the line, by removing the #: – as below - net.ipv4.ip_forward=1
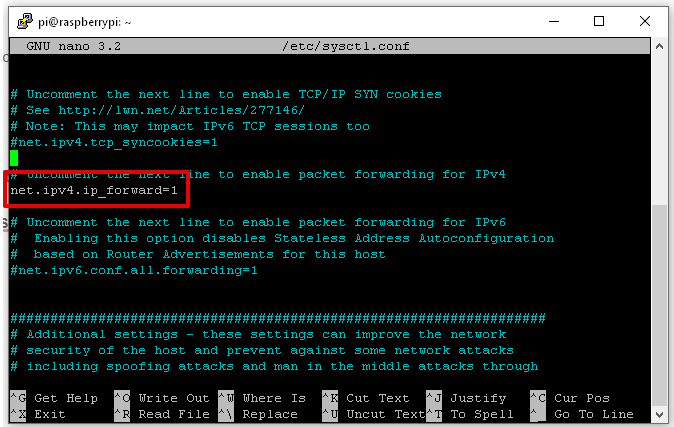
You can now reboot the Pi – sudo reboot now
Next, let’s do the command on the Amiga. For networking I’d recommend the Roadshow TCP IP Stack – the only reason being is that I know it works and I have a copy.
Firstly you need to install roadshow. The demo version of this is time-limited so your network access will be cut off after 15mins. Once installed, run the following commands from your Amiga Shell. Again check the commands before committing.
- copy PISTORM:a314/a314eth.device DEVS:
- COPY PISTORM:a314/eth-config-amiga/A314Eth DEVS:NetInterfaces/
- COPY PISTORM:a314/eth-config-amiga/routes DEVS:Internet/
- COPY PISTORM:a314/eth-config-amiga/name_resolution DEVS:Internet/
Note that the instructions on https://github.com/beeanyew/pistorm/tree/wip-crap/a314 contain a typo for the name_resolution file (its not name-resolution) – it’s also missing the full command. It’s corrected above
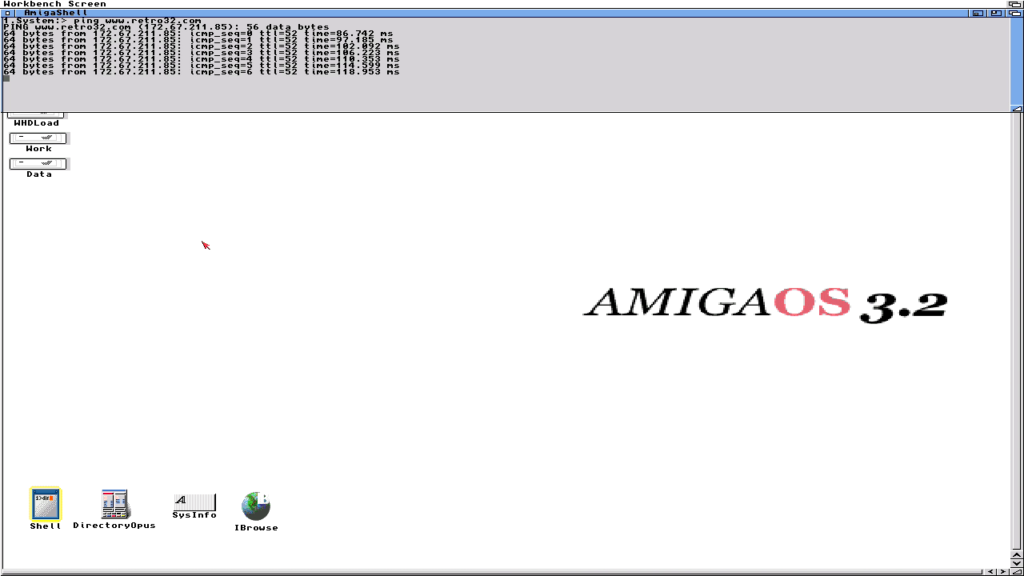
Now reboot the Amiga (Ctrl A + A) open a shell window and type ping www.retro32.com – you should get a response as below
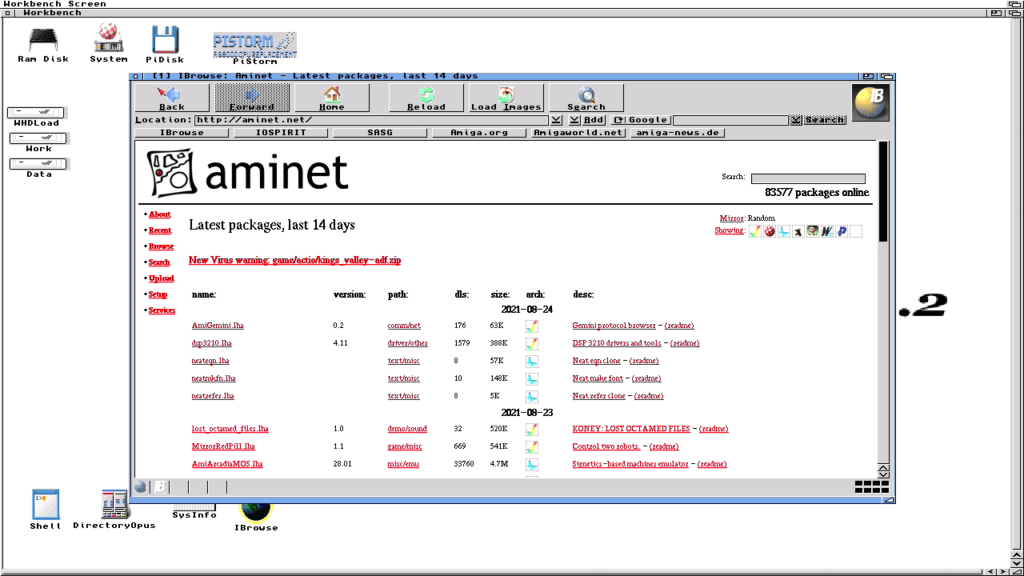
And here is Ibrowse working perfectly! – note that I had to install MUI38 first
Enable RTG
RTG or Retargetable graphics enables the display signal from the Amiga to be routed through the HDMI port of the Pi. When this is configured it will allow high resolutions and colours from your humble machine. Note that applications that are not RTG enabled will continue to be displayed using the RGB port. This is most apparent when you run most games or sysinfo. There are some RTG-enabled games such as ADoom.
Instructions taken from https://linuxjedi.co.uk/2021/07/18/this-week-in-pistorm-2021-07-18/
- Install the Picasso96 software – when prompted select the “Picasso IV”
- Run the installer located in the PiStorm. RTG folder called “PIGFX Install” – it will prompt you for the installation folders for Picasso96 so don’t forget where you installed it from.
- Reboot your Amiga
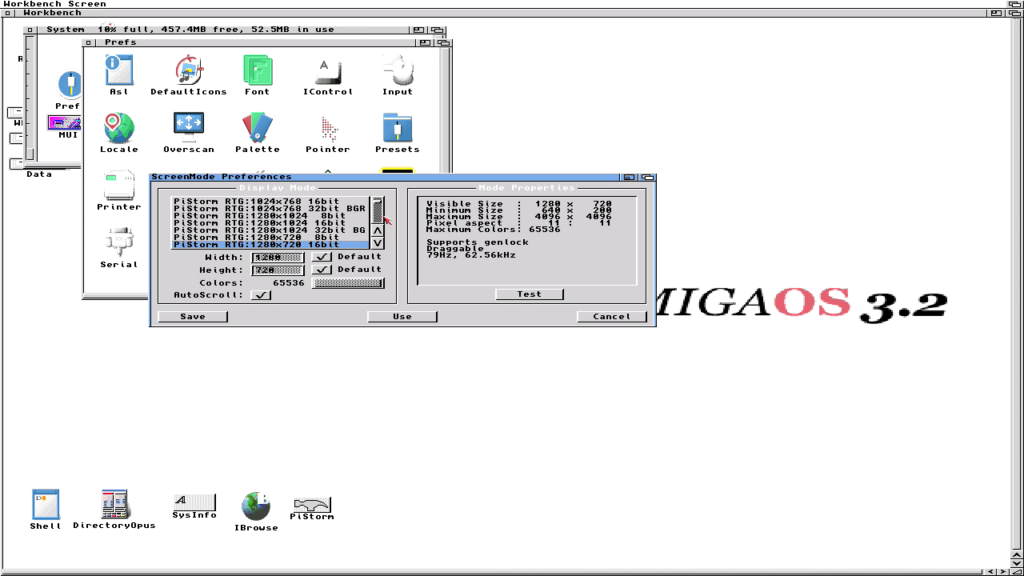
- Now select your screen mode on the Amiga (Prefs > Screenmodes). If you scroll down you will see a list of lovely PiStorm entries – I would suggest you select 1280×720 16bit – this will match the screen resolution we have previously configured in the raspi-config setup.
- Be sure to use the test feature before saving the screen mode. Note that when using RTG the output will switch over to the Pi’s HDMI display and your RGB signal will be lost. It should look a little like the one below
Have you ever experienced a HiRes Amiga? I was total blown away! DOpus looks epic!
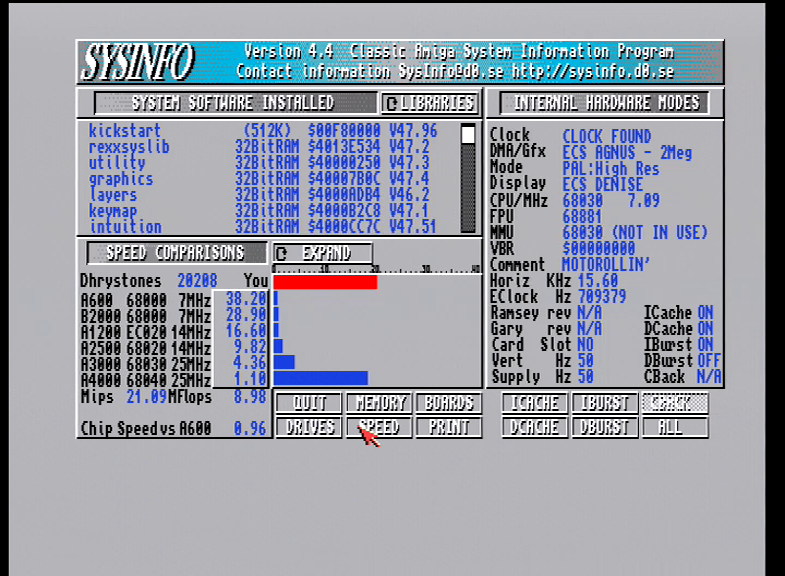
Sysinfo
I suppose it’s only fair to include an obligatory SysInfo screenshot for good luck. This is from my test bench A500+ with 2MB RAM. If like me you’ll be using it for a little WHDLoad – you’ll have an issue with a lack of chip ram on the 500 with only 1MB.
Finally!
Well, this was an adventure. I spent many an hour, drank countless cups of coffee, and acquired even more grey hairs. But it was all worth it. Whilst still under development the PiStorm shows the pure talent, skill, and collaborative efforts of the Amiga community. I take my hat off to all that were involved in the development of both the hardware and software. Fu**ing legends.
Be sure to keep up to date with the current PiStorm developments with the LinuxJedi – https://linuxjedi.co.uk/category/personal/retro-computing/pistorm/
As I said in the intro, this is all very new to me. I’m no expert. I really struggled to find much of the information above and pull it all together, and whilst I am from a technical background I’m certainly no expert and I’d like to thank all the folks who have published the wealth of information out there.
I hope you found this useful and please let me know if you’ve spotted anything wrong, incomplete, or just plain stupid.
Enjoy and long live the Amiga.
Hi Retro32UK,
Thank for this great Tuto !
Note that you have a type here ->
sudo iptables -A FORWARD -i wlan0 -o tap0 -m state –state RELATED,ESTABLISHED -j ACCEPT
Should be –state (not -state)
sudo iptables -A FORWARD -i wlan0 -o tap0 -m state –state RELATED,ESTABLISHED -j ACCEPT
Best Regards,
Shugal
You write the same in both… -state and -state. Where’s the difference? IIRC it should be “–state”.
I’m getting:
Bad argument `–state’
when attempting to setup the networking section.
If I account for the possible typo of the [minus] instead of [dash] in front of state – then I get:
Bad argument `RELATED,ESTABLISHED’
…anyone got any ideas?
never mind – the full CORRECT syntax is below:
sudo iptables -A FORWARD -i wlan0 -o tap0 -m state –state RELATED,ESTABLISHED -j ACCEPT
The above comment is AUTO corrected [which is why ALL of the syntax including the original is incorrect]
In the part above in the syntax you need two single dashes before the word state.
The website auto correct merges these into a minus sign instead, which is wrong.
The iptables syntax is std. Linux; if in doubt or encountering any complaints when hitting enter, it’s easy to look it up on google, duckduckgo or whatever, to find the correct syntax, commands, etc. Iptables is a great firewall which offers great protection and tweaking of rules to suit one’s need, including routing/forwarding, etc. It’s well worth digging into this if not familiar with it, although the Pistorm require only a few rules to work.
I’m on the verge on trying the Pistorm on my CDTV myself; although perhaps not yet fully supported, I’ll try my luck nonetheless. Quite exciting with the possibilities it gives! 😀
i@raspberrypi:~/pistorm $ sudo iptables -A FORWARD -i wlan0 -o tap0 -m state -state RELATED,ESTABLISHED -j ACCEPT
Bad argument `RELATED,ESTABLISHED’
Try `iptables -h’ or ‘iptables –help’ for more information.
Awesome guide, super thanks!
The Networking bit is not working for me, though. First I had to install iptables via apt-get (worth adding that line to the guide), then even correcting for the double dash on the state parameter, I never get the query about IPv4/IPv6 you refer to.
I wonder if the syntax for iptables has changed? This is what I get with an iptables -L:
Chain INPUT (policy ACCEPT)
target prot opt source destination
Chain FORWARD (policy ACCEPT)
target prot opt source destination
ACCEPT all — anywhere anywhere state RELATED,ESTABLISHED
ACCEPT all — anywhere anywhere
Chain OUTPUT (policy ACCEPT)
target prot opt source destination
Found the issue. We’re missing a command after the last iptables entry:
sudo apt install iptables-persistent
This will make the changes permanent and prompt the question about IPv4 mentioned in the guide above. Hope it helps!
I had the same issue. I have recently revisited this as I had to re-install the SD card. I found no way of the iptables command to complete.
However, this method did:
/// Change root password
sudo passwd root
/// Go SuperUser
su
/// Issue the comands
iptables -A FORWARD -i tap0 -o wlan0 -j ACCEPT
iptables -A FORWARD -i wlan0 -o tap0 -m state –state ESTABLISHED,RELATED -j ACCEPT
iptables -t nat -A POSTROUTING -o wlan0 -j MASQUERADE
Not sure why SUDO doesnt work, but SU does?
Please make sure your system configuration allow to forward packets.
echo 1 >/sys/net/ipv4/ip_forward
Please check spelling – the path is from memory.
The article (superb by the way) states that those with 1MB of chip RAM (the max in the original A500) will have issues with WHDLoad.
If I’m only planning on playing OCS/ECS era titles on my Amiga with PiStorm, would having only 1MB of chip RAM be a problem?
Hi
Firstly great tutorial!!!
I am considering buying a PiStorm/Raspberry for my A500 , but before doing so I’d like to know if this all runs independently after setting up or is the PC required permanently to run along side the Amiga ?
Hi
Thanks for your comment. Once set up a PC is not required, the PiStorm is a completely standalone product. We also offer a fully built kit that will not even require a PC to get you up and running. Please feel free to contact me [email protected] if you need any further help.
Cheers
Thanks a lot for the guide, I really appreciate it!
Thank You sooooo much,
this is pretty much the first complete and comprehensive and the nicest tutorial for setting up the PiStorm correctly!
I am so grateful; yes, You can compile all the bits and pieces together, but there’s nothing more frustrating than spending hours and headaches with things, You barely got in touch with.
I spent about an hour figuring out that line for the network with the ‘–‘ issue, but I’m also glad that at one point I scrolled down to the comments and found the solution. Thank You also to all the people that corrected the ‘autocorrected’ versions.
Thank You, Thank You, Thank You. I really squeaked out in joy when everything just worked right!!!! What a feeling.
Best Regards,
Chris from Germany
Hi Chris
Thanks for the feedback – very glad you got it sorted. I’ve updated the article to correct that.
All the best and long live the Amiga 🙂
Cheers Karl
Does the A570 or other expansion port devices work with this? Do you need to use 68030 option, can it simulate a 68k maybe at 14MHz? Thanks, great write-up.
Awesome product and guide, thank you so much!
Hi Cant get PI0: to mount get error message Error: Keyword ‘Surfaces’ requires a number (file ‘DEVS:MountList’ line 4, column 27) any help would be welcome I am new to Amigas and this is driving me nuts as everything else seems to work, thanks
Hi Brendan. Have you figured this out yet? I’m having the same issue.
Try removing the spaces in the file. eg:
Surfaces = 1
I had the same issue. I opened a shell and typed Ed DEVS:mountlist
I then moved down to the surfaces line and just deleted the 1 and then typed 1 in again and saved the file.
Problem solved
That worked for removing the error message, but I don’t get any PiDisk showing up?
I’m following this beautiful guide, thank you first of all! For macOS I recommend Terminus instead of Putty and Firezilla instead of WinSPC. I have a question, how far can I get to prepare the Raspberry not having the Pistorm yet?
make fails with the errors:
/usr/bin/ld: cannot find -lbrcmGLESv2
/usr/bin/ld: cannot find -lbrcmEGL
now what? I hate this linux nonsense, why isn’t there a prebuilt image I can use.
i have the same issue has this been solved yet
I ran over the Guide, some things have changed over Time, but it is a very good guide for somebody new on this, Thanks!!!!!
at command ./flash.sh
I get Detecting CPLD… Could not detect CPLD
What does this mean? Do I have a bad chip?
I have the same problem. Everything else seems to work fine though,.
i had the same problem but i found the solution for this:
use “sudo apt-get install openocd=0.11.0~rc2-1”
Thanks to Phalkon13 on github.
Hello i had the same problem but i found a solution at Github.
if you use “sudo apt-get install openocd=0.11.0~rc2-1”
instead of “sudo apt-get install openocd”
then you get an older version that will work for the CPLD.
Thank so much !
Could this tutorial be updated to the later version of bullseye for the Pi.
I do have some problems of getting it working.
I allready spent a lot of time but cant get it working.
The Pistorm and the A314 are two different boards, the A314 plugs into the clock port on the A1200. So will this work for the A314 as well?