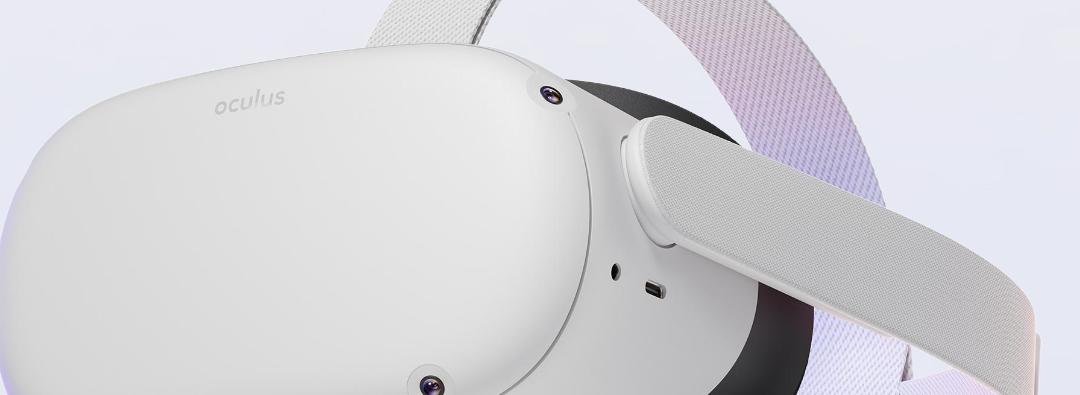
This Christmas I finally joined the VR club, Santa truly delivered with my very own Meta Oculus Quest 2. Whist he I did consider offerings from HTC, the price and flexibility of Meta’s white VR headset won me over in the end.
Not only does the Quest 2 offer a complete VR solution with its onboard hardware, it can also behave like a traditional headset, allowing it to be connected to a PC. Once connected (using a compatible link cable) it allows you to play VR compatible games from Steam using SteamVR. Together, they open the door to some truly amazing titles such as Boneworks and Half Life: Alyx. These titles are breathtaking and require a PC to do the heavy lifting as the processing power of the Quest is not up to the challenge of such complex games.
For me, this is the real appeal of the Quest 2 – having a complete wireless solution and also the flexibility to use it gaming PC link a traditional headset.
Note: If you’re in the market for a Quest 2, there are often some great promotions. I secured mine from Amazon and received a £50 Amazon gift voucher, bringing the price down to £250. When you factor in the £23 referral credit (credit for use on the store) it worked out a steal at just £227.
What PC spec for you need for Oculus link?
Meta / Oculus list the “minimum” requirements for Oculus Quest 2 in link mode as below
- Processor: Intel i5-4590 / AMD Ryzen 5 1500X or greater
- RAM: 8GB
- Windows 10
- A USB Port
Most importantly you will need an AMD Graphics card – 400 series or Nvidia 1650 Super. Whilst these are listed as “compatible”, I would not try and use anything less than a 1070 / 3060 for the best experience.
A PC without the grunt will cause framerate issues and can make the experience VERY unpleasant. Framerate issues are not fun in VR, it made me feel very sick and put me off using VR for a long time.
My own gaming “rig” has the following spec: AMD 3800X – 32GB RAM – Windows 11 – USB 3.2 and an NVidia 3070. This makes for a very smooth VR experience, even when the action hots up. This tier of GPU does not come cheap however for an enjoyable PC Link experience you really do need the horsepower.
You can view the full system requirements on the Oculus website – https://support.oculus.com/articles/headsets-and-accessories/oculus-link/oculus-link-compatibility
What cable shall I use for PC Link?
The official cable from Oculus commands an eye-watering pricetag of £90… yes, £90 for a USB cable. Do yourself a favour and keep reading. We ordered two cables and settled on a clear winner.
Anker USB Powerline 3.0 10ft

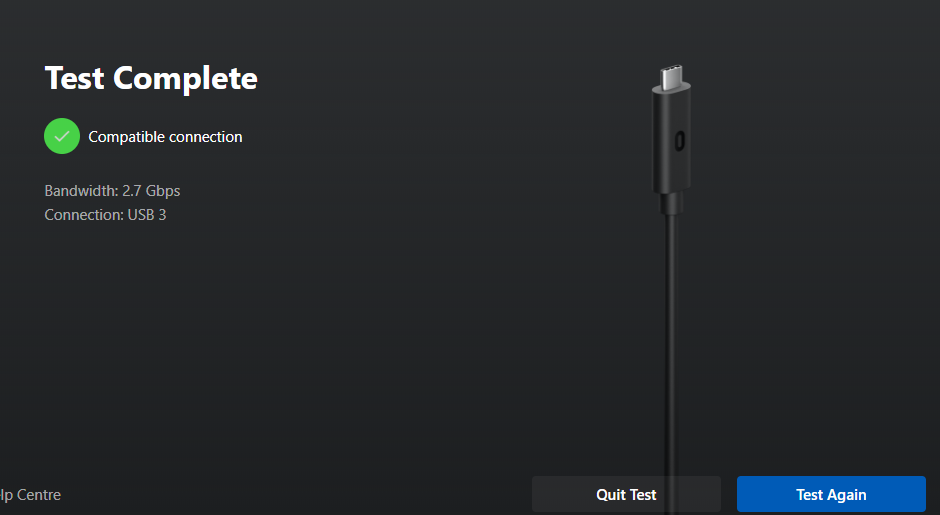
I’m a big fan of most things Anker but not this cable. Whilst it features a sturdy design, the lack of a right angle connector had me concerned about damaging the port due to stress. The cable’s 10ft length was also not long enough for me to play at a comfortable distance from my PC / desk.
Using the Oculus PC app’s cable testing feature revealed an impressive speed of 2.7Gbps. This gave smooth performance but the short cable and my worries over the connector ruined the experience. It was promptly returned.
Amazon Link – https://amzn.to/3mKoHBA
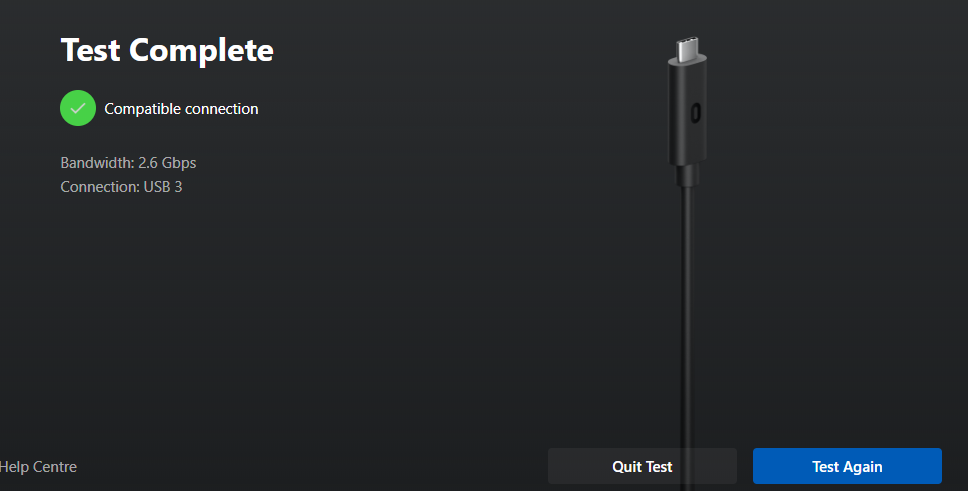
Syntech Link Cable
Whilst being nearly £10 more expensive than the Anker cable, this was money well spent. The right-angle design helps reduce the chance of port damage and the 5m (6ft longer than the Anker) made my concerns about the USB cable tether melt away. The cable has much more of a premium feel, in fact, it looks like something that should have been bundled in with the Quest 2 in the first place.
The speed test revealed that this was a little slower than the Anker cable however considering it is over half the length again, it performed better than I expected. As below – 2.6 Gbps
Amazon Link – https://amzn.to/32HybH0
Either cable will offer you a great PC Link experience however I’d strongly recommend the Syntech cable, it’s well worth the extra £10.
*Update* – I’ve since found this little nugget on Reddit – with one user claiming that his “official” cable only reached 2.7 Gbps. That’s a nail in the coffin for the £90 lead.

Do I need a USB 3.2 port?
Whilst the official cable is USB C to C, I chose a traditional USB A cable for the PC end of the equasion. Whilst the type connector isn’t an issue, the USB port speed certainly is. Using a USB 2.0 port, the connection speed reported by the Oculus app would not reach over 1.1 Gbps, less than half the speed of the USB 3.2 port. If your PC does not have a USB 3.2 port then I would strongly suggest installing a USB 3.2 PCIe card. These are available from Amazon
Please note that I have not tested any of the above cards however they do seem very popular on Amazon.
Keeping the USB Link Cable / port safe and secure
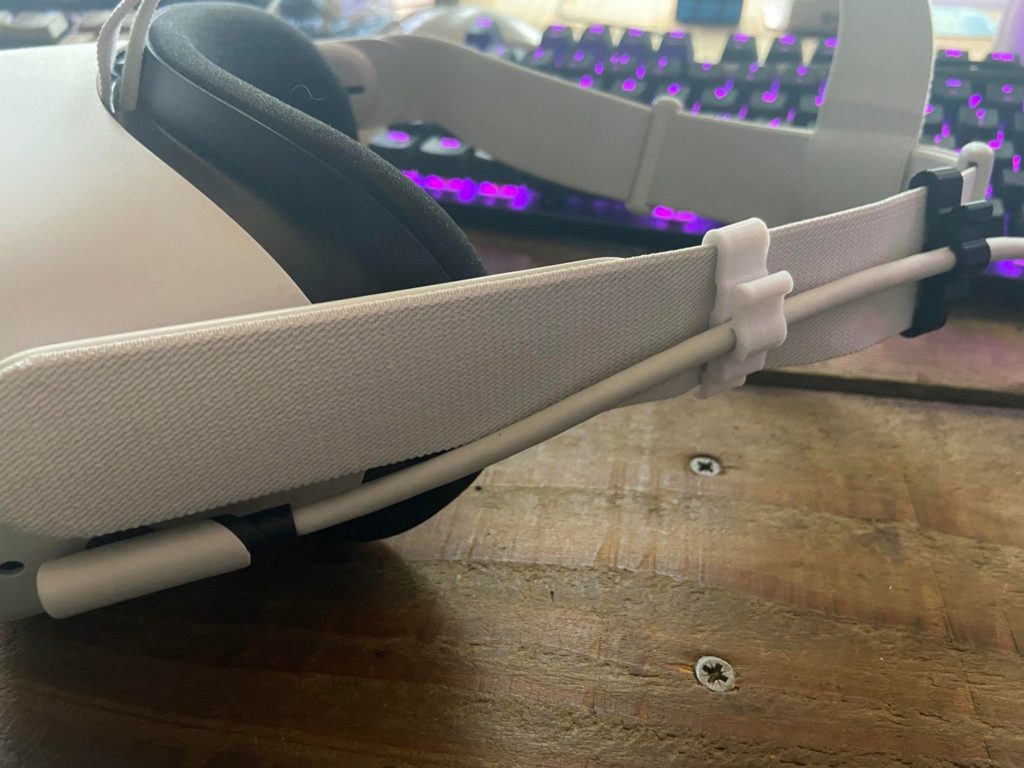
Whilst my cable concerns were put at ease, having a way to secure the cable safely behind my flailing arms was something I was keen to do. Both cables feature a velcro tie to help secure the cable to the head strap however I found that it would slide forwards and rendering it useless. Subsequently, we have produced a pair of 3D printed clips for both the standard and elite head straps. You can find them below in our store.
Let’s hear from you
Have you had success with any other PC Link cables? Have you got any further tips for Quest newcomers? I’d really like to hear from you if your pockets were deep enough to buy the official cable and see how my speeds compared. Let us know in the comments below