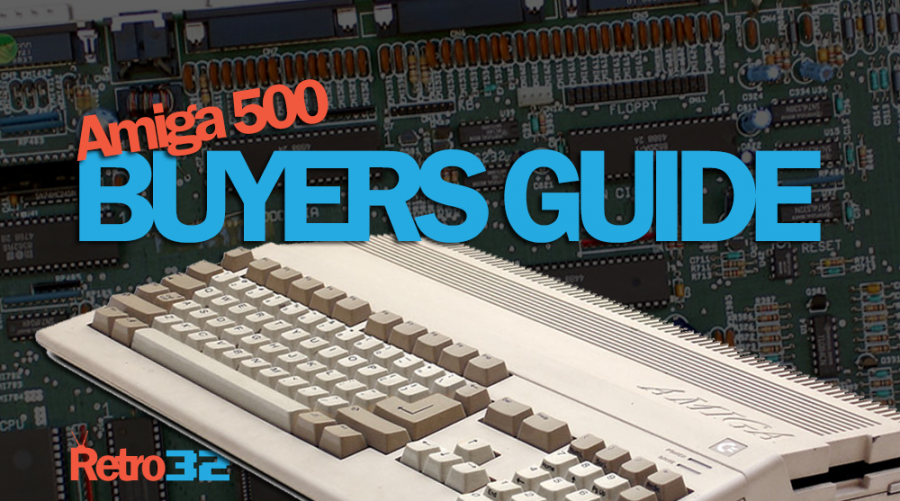
The Commodore Amiga 500. Arguably the best 16-bit console computer ever made (certainly my favorite). Whilst many people called it a console, it was a lot more. It was a home computer for the masses that did everything. Homework. Gaming. Programming. Productivity. The Amiga 500 was the jack of all trades and maybe even the master of some in its heyday.
Quick Links
- About the Amiga 500
- Upgrades
- Amiga 500 Games & Utilities (Software)
- Common Issues
- Buying an Amiga 500
About the Amiga 500
Release Date
The Amiga 500 was released in 1987 and over the years proved to be Commodore’s best selling Amiga model. Ever. It’s estimated that over 6 million units were sold. In 1991, the “enhanced” successor to the 500 was released, namely the 500+. The 500 series Amiga was eventually discontinued in June 1992 and was replaced by the baby A600. You can read more about the Amiga 600 in our Amiga 600 buyers guide. (Coming soon)
What’s the difference between the Amiga 500 and 500 plus (500+)
The A500+ was introduced in late 1991/1992 for a number of reasons. Minor changes were made to the motherboard to make it cheaper to produce, it was also Commodore’s was of introducing a new version of the Amiga operating system (2.04) or kickstart. This causes a number of compatibility issues with older games. The A500 also rolled off the production line with 1MB ram as standard and a battery-backed RTC (Real Time Clock).
Due to the compatibility and battery issues, we’d advise that unless you’re adding a 500+ to an existing Amiga collection, you should opt for a 500 over the plus.
Amiga 500 Spec
Processor: Motorola 68000 microprocessor running at around 7 MHz
Ram: 512 KB of chip RAM (1MB in the Amiga 500+)
Software: Amiga OS 1.2 / 1.3 – also known as kickstart
I/O: 1 double-density floppy disk drive
Interfaces
1× serial DB25 male, RS232
1× parallel DB25 female, Centronics
1× video DB23 male, analog RGB
1× composite, black & white
2× mouse/game DB9 male
2× stereo audio RCA jack
1× external floppy DB23 female
1× internal floppy 34 pin header
1× trapdoor expansion slot
1× side expansion connector
Controllers and Joysticks
The Amiga 500 features a 9-pin Atari controller port. This meant that as we all the huge array of purpose-built controllers made for the Amiga, it was also compatible with my favorite controller – the Sega “batwing” Mega Drive controller. Another popular choice was the classic Competition Pro joystick, it’s iconic design and bombproof construction made it a popular choice.
The Amiga 500 was bundled with the iconic Tank mouse. This two-button mouse is a design classic and provided to be very reliable. As with all ball mice, it required some maintenance and cleaning but overall it proved to be a solid point and clicker.
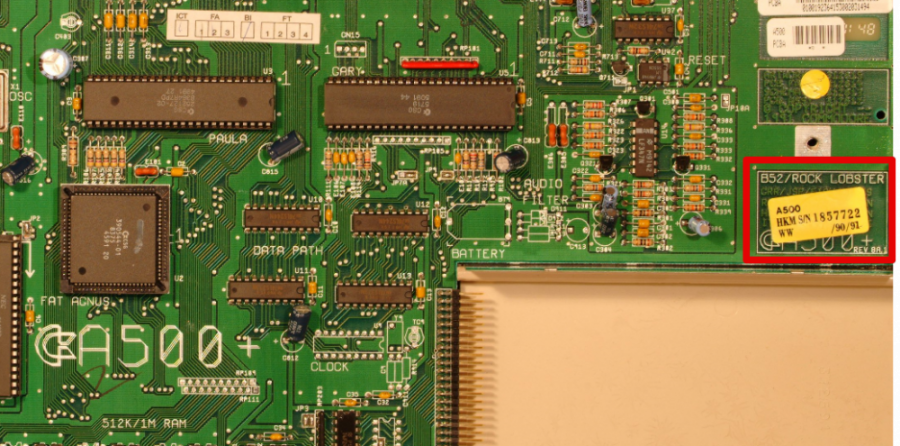
Motherboard Revisions
The Amiga 500 was released with a number of motherboard revisions. We would suggest going for the latest version you can find, however, it’s not always that simple without opening up the machine. As below, the revision number will be clearly printed on the motherboard.
- Revision 3
512 kB Chip RAM on motherboard as 16 chips – Kickstart 1.2 ROM - Revision 5
Fat Agnus 8370 (NTSC) or 8371 (PAL) - Revision 6
Fat Agnus 8372A (part of the ECS chip set) supports 1 MB Chip RAM Agnus is rotated 90° counter-clockwise – 512 kB Chip RAM on motherboard as 4 chips – empty places for other 4 chips giving 1 MB RAM on the motherboard – Kickstart 1.3 ROM - Revision 8 (all Amiga 500+)
Kickstart 2.04 ROMs and ECS chip set: Fat Agnus (8375), Super Denise (8373)A500:512 kB Chip RAM on the motherboard battery and clock circuit is missing A500 Plus:1 MB Chip RAM on the motherboard battery backed up real time clock
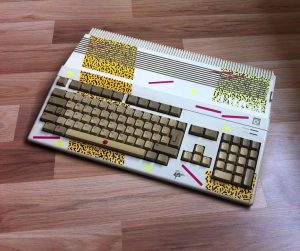
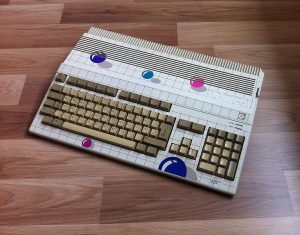
Special Edition Amiga 500 “New Art”
If you spend way too much time lurking around the Amiga Facebook group pages, you might have spotted a couple of “special edition” units being flaunted. These two “New Art” units were produced to commemorate the millionth Amiga sold. Commodore Germany produced two special edition A500 ‘New Art’ case designs. The first depicted a tiger theme, with a second design sporting five coloured balls. The case graphics were designed Stefanie Tücking of the German radio station SWR3.
Inside the units remained the same but as you can expect, the prices these limited edition consoles go for is not!
Software
Games
This is where things are going to get controversial. Rather than attempt to rank the best games available for the Amiga 500. I’ll list my favorites titles from a number of genres
- Platformer: Zool
- Racing: ATR (All Terrain Racing)
- Driving: Skidmarks
- Simulation: Birds of Prey
- Combat: Jet Strike
- Puzzle: Lemmings
- Sports:
Speedball 2Sensible Soccer
Other notable games include Magic Pockets (check out our video here), Supercars 2, Pirates! and The Secret of Monkey Island. Whilst most (maybe all) of the games above were not exclusive to the Amiga 500, they were games that still hold a very fond place in my heart.
Utilities
Workbench
Workbench was the graphical file manager for the Amiga – think of it as the Amiga “Windows”. It provided a GUI interface enabling utilities, applications and games to be executed in a “desktop” type environment. The Amiga 500 was shipped with Workbench 1.3.
The Amiga 500+ (running kickstart 2.04) was shipped with an upgraded version of Workbench 2.04.
Deluxe Paint
Deluxe Paint (or DPaint as many knew it) was a title synonymous with the Amiga. It was the go-to paint and later animation tool for the system. If you had a 500 as a kid, there was a very high probability that you had DPaint in your software library. Who could forget that iconic pharaoh?!
DPaint began its life as an in-house art development tool called Prism and later in its life was used extensively by game developers for the creation of graphical games.
Upgrades
Essential Upgrades for the Amiga 500
It’s been a while since we last updated this article, a lot has changed since then. We are proud to now offer a wide range of Amiga 500 upgrades including the mighty PiStorm and RGB to HDMI adapters. You can check out our products here
https://www.retro32.com/product-category/amiga/amiga-500
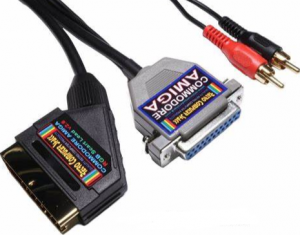
- Scart cable
Using a scart cable on your Amiga 500 is like night and day compared to the bunded RF modulator. It gives you a crisp, vibrant picture without having to tune in your TV. They are available on ebay / amazon (click here). The cable connects to the video DB23 male port accompanied by both the left and right audio connectors. We simply can’t recommend this enough. - 1MB Ram Expansion
Many later games required the half meg memory expansion (a full 1MB of fast ram) in order to play them. 512KB of Fast RAM can be added to the Amiga 500 and 500+ using the trapdoor expansion slot. This is a simple upgrade that can be completed in just a few minutes with no tools or soldering required. - Gotek Drive
A Gotek drive is a USB Floppy emulator that replaces your internal floppy drive. It features a USB slot and a small display indicator. The Geotek uses floppy disk images stored on the USB drive to “emulate” its content as if it were physical media inserted into the floppy drive. It allows a huge catalog of games to stored and played from a relatively small USB drive. - External Floppy Drive
Having a second floppy makes both 2 disk games andcopyingbacking up games a much easier and quicker process. They are easy to install and plug directly into the external floppy port (DB23F) on the back of the Amiga. Up to 3 additional floppy drives can be connected using the port (daisy-chained) giving the A500 a whopping 4 drives. - USB Adapter
A USB adapter lets you use modern peripherals with your beloved Amiga. Personally, I don’t think you can beat the sturdy “Tank Mouse” and Mega drive pad combo. These adapters open up the 500 for a wide range of new input devices, maybe not one for the purists. - Accelerators – Terrible Fire 534
Some games available on the Amiga 500 pushed the limits of what the 7mhz Motorolla processor (looking at you Elite 2). Accelerators such as the Terrible Fire 534 offer a speed bump from 33mhz all the way up to a giddy 50mhz of pure power. The card slots in place of the original CPU and can be used with a CPU relocator adapter to allow fitting in a standard 500 case.
Common Issues
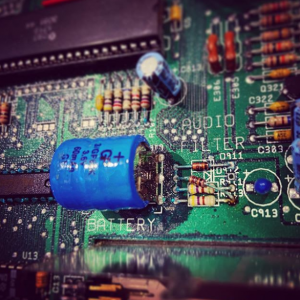
- Battery Leaks / Failure (Amiga 500+ )
Having recently purchased what looked to be a mint condition Amiga 500+ plus, I’m now fully aware of the dangers of a leaking battery. Whilst the initial booting of the machine looked promising, after a short period of time the 500+ locks up with some graphical errors and crashes. As you can see from the photo, the battery has leaked and caused some localised damage. The battery will be removed from the machine and it’ll be sent over to AmigaPassion for some TLC and a recap. Click here to jump down to our battery removal section - Yellowing
As with all our beloved beige machines, yellowing (for some) can ruin the timeless looks of the Amiga. This can be cured by retrobrighting or Sunbrighting the console. Retrobrighting uses Hydrogen Peroxide to bleach the plastics back to their original colour. This comes with its risks. We’ll cover this in a dedicated article coming soon. - Failed power supplies
Failed power supplies on the Amiga are a relatively common issue. Power supplies can be replaced using a known working unit or can be fitted/modified to accept an ATX power supply. - Video issues
Video/display issues can be caused by a number of things. These include memory modulate failure or even a chip becoming loose on the motherboard. We experienced green video on a recently Amiga 500 purchase and found that the CIA chip was not seated correctly. This was resolved by pressing the chip back into its socket.
Amiga 500 Plus (500+) battery removal
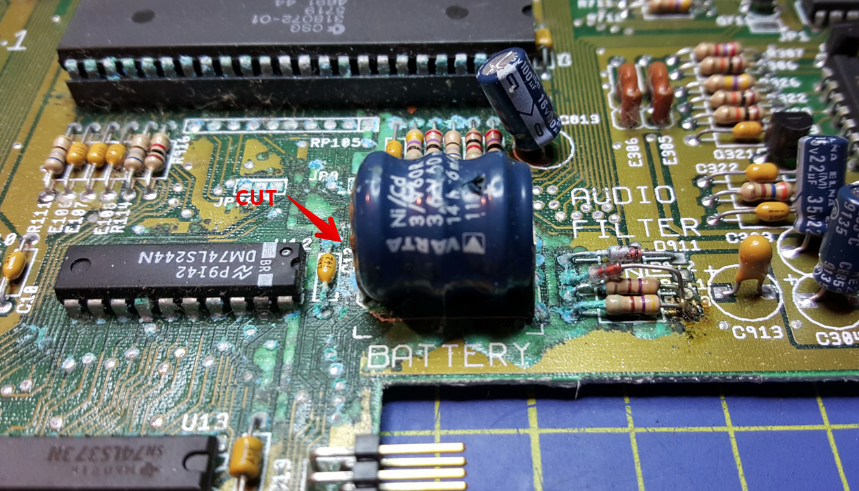
We’ve never been quite sure why the Amiga 500+ needed a battery-backed RTC (Real Time Clock). As above, it’s one of the biggest issues for the Amiga 500+. To save yourself future heartache we’d suggest that even if the battery isn’t leaking, you remove it anyway.
The removal process is relatively simple. With a pair of small sharp wire cutters remove the foot pin from the left of the battery. Then lift the battery up and over to the right and back again – weakening and eventually breaking the legs on the right. If you’re handy with a soldering iron you can remove it “properly” but we don’t really see the need.
As you can see on the image below, the leakage from battery can cause considerable damage to an Amiga 500+ motherboard.
Does the Amiga 500 need recapping?
We covered Amiga recapping in our article WHY YOU SHOULD RECAP YOUR AMIGA – AMIGA RECAPPING FAQ
The Amiga 500 used higher quality through-hole capacitors which did not suffer the same fate as those on the A600, A1200, A4000 and CD32 which use surface-mounted units, prone to failure.
Unlike the A500+, the humble A500 did not contain a battery, this prevented issues with leaking cells causing untold damage as they leaked over time.
Whilst not necessarily an absolute must, recapping the A500 does have its benefits. It will help lengthen the life span of the machine and also help resolve issues with poor sound and video quality. At present, both my A500 units remain with the standard capacitors whilst my beloved A1200 and CD32 were sent away for recapping immediately after purchase.
Buying an Amiga 500
Where to buy your Amiga 500
There a number of market places offering the sale of second hand Amiga 500 machines. We’d be very careful of eBay, we’ve heard from a number of buyers who have been duped into buying faulty consoles. Amiga eBay prices also seem to be inflated compared to those seen elsewhere. Our Amigas were purchased through the various Facebook groups and apart from our CD32, they were collected and tested in person.
If possible, always test before you hand over and cash or buy from a trusted Amiga enthusiast. Both our Amiga 1200 and 500+ units were essentially faulty but sold as working machines. As with many “vintage” electronics, it’s very much buyer beware.
How much should you pay?
Depending on age, condition, bundled accessories and games you can pay anywhere from £30 to £200 for an Amiga 500. I would strongly advise that you test the machine thoroughly before you hand over your cash. Test all the keys, the display and sound quality. Is the floppy drive in order and is there any water damage? Make sure all the required cables and power supply are included. Be sure to check if the machine has already been upgraded to 1MB of ram, this could be a negotiating point.
Work in progress
This article is a work in progress – please feel free to submit additions or correct any information above in the comments below or contact us.
Let’s hear from you!
What are your thoughts on the Amiga 500? What are your tip tips / essential upgrades or top tips for a would-be buyer? What was your favorite game for the Amiga 500?
We’re also looking for anything which needs adding or is incorrect with this article. Let us know in the comments below.
What alternatives for a better picture are there if you don’t have access to SCART?
Hi Adam
If you don’t have access to a Scart TV then we’d suggest getting either an OSSC or RGB to HDMI adapter – we covered these in the article below
https://www.retro32.com/gaming/amiga/200220212533-amiga-5000-rgb-to-hdmi-adapter-vs-ossc-comparison-side-by-side
https://www.retro32.com/gaming/amiga/140220212502-amiga-rgb-to-hdmi-adapter-fitting-guide-how-to
Cheers Karl
Hey I was wondering if I could get some Information on the “Startup Floppy”? My grandfather has an Amega 500 In his shed and it works well. Except it won’t activate without it. If someone knows ANYTHING about it, please put it on the page.
Thanks!
You need a Workbench disk. Just Google Workbench and you’ll find all the information you need, including Youtube videos.
Hello
If I buy an Amiga 500 in England or in the USA, how do I use it on a flat screen TV in France (PAL) ?
If you use a RGB to HDMI adapter you can connect your image to a TV using HDMI. I sell them in our store.
https://www.retro32.com/product/amiga-rgb-to-hdmi-cpld-pizero-adapter-amiga-500-amiga-500