I’ve always been a fan of big box games but my collection is getting out of hand, we’ve also been struggling with failures of our 20+ year old floppies, a Gotek is the perfect solutions for this. For a very small sum (less than a couple of boxed games) you can literally have EVERY Amiga game ever published on a humble memory stick
We’ve been reading a lot about these inexpensive devices on social media so we thought we’d see what all the fuss was about. This was our first time using a Gotek, so we’ve put together this article to help others struggling to get to grips with it all – from start to finish.
Please let us know if there’s anything we’ve missed or got completely wrong.
** Update – 6/1/2020 – Following feedback from the Amiga Community we have now put this process into a video. Click below for the full video tutorial. Note that you will still need this page for all the download / page links
https://www.retro32.com/amiga-resources/060120212131-amiga-gotek-video-tutorial-how-to-run-and-save-games-from-usb-setup-flash-floppy-menu
What is a Gotek Drive
A Gotek drive is a USB Floppy emulator that replaces your internal Amiga floppy drive with a small circuit board with a USB slot for storing and loading software. The drive uses ADF (Amiga Disk File ) disk images which are essentially a “backup” of the original floppies.
These drives can be put in an external enclosure but it will require a DF01/DF1 switcher unless you have an Amiga 1200. We’d recommend for simplicity that unless you really need your floppy drive then simply replace the internal drive.
Where can I buy a Gotek drive?
Well, you’re in the right place. We sell a variety of Getek packages to cater for all needs. See the link below
Installing your Gotek
The installation of your Gotek is quite a straightforward procedure.
- Pop your case apart, remove the keyboard and metal shielding
- Remove the ribbon and power cable from the floppy disk, leaving the connectors on the motherboard
- Remove the floppy drive by unscrewing the side mount screens and also the riser stands. The riser stand screws are located underneath the case.
- Place the Gotek drive into the machine in place of the floppy drive and connect the cables (see below). Ensure the drive is secured – you might need to replace any flat screws with small “self-tapping” style screws in order for them to bite into the plastic of the drive mount.
- Reassemble the Amiga case making sure that the new drive doesn’t foul any of the components protruding from the Gotek (as below)
Here is ours secured into our favorite 500
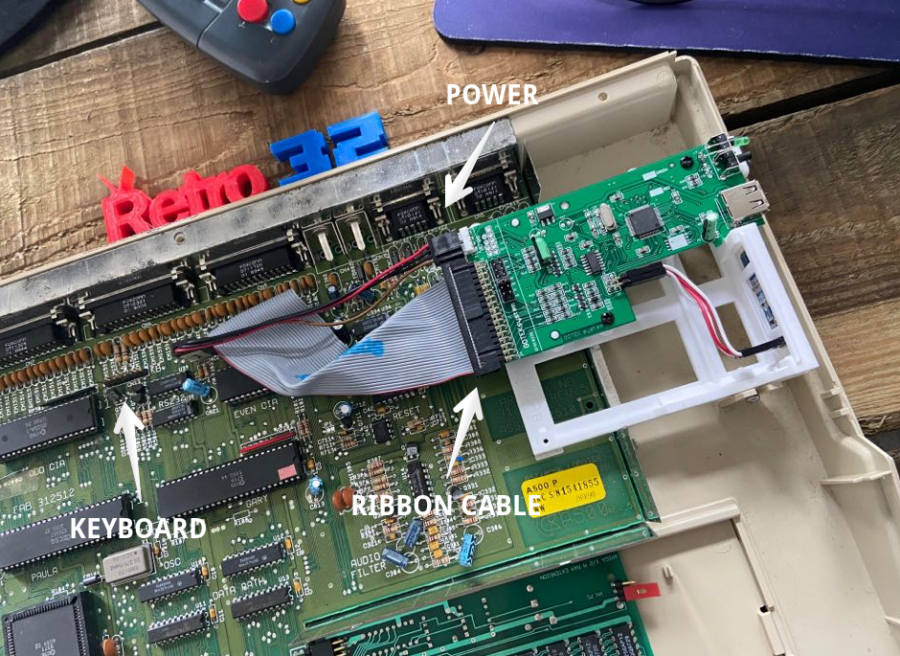
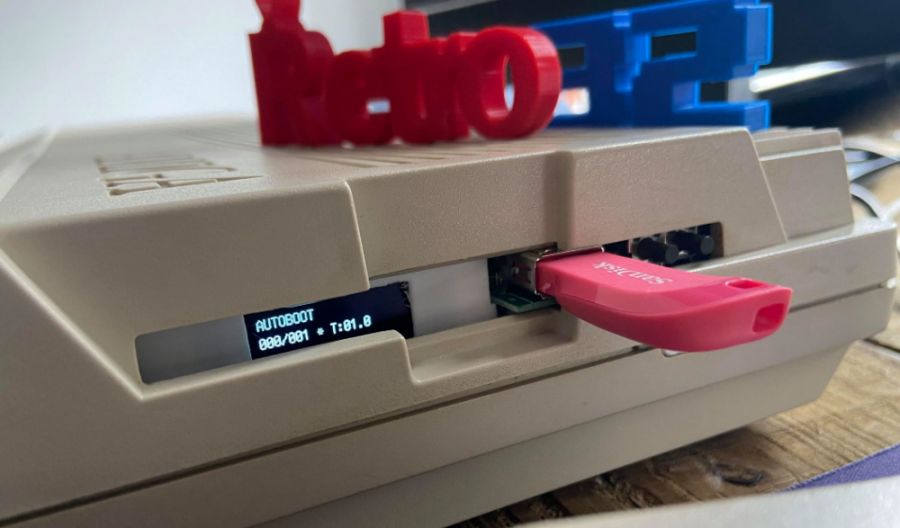
Check out the drive in our Amiga 500, check out that lovely pink memory stick!
Setting up your USB Flash Drive
We’ve recommended using a 64GB flash drive, you’ll see why when you download the games. We recommend Amazon for your drive – just MAKE SURE it is dispatched and sold by Amazon. Unfortunately, there’s a lot of fake USB drives from marketplace sellers.
Any one of these would be just great!
Let’s get your USB drive setup!
- Pop the drive into your Windows PC. It should be formatted using FAT32
- Download FlashFloppy from their Github (use the latest Stable) – https://github.com/keirf/FlashFloppy/wiki/Downloads
- Extract the ZIP file to your desktop
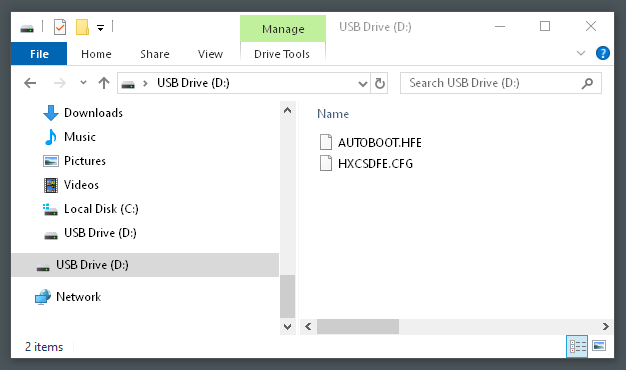
- Copy the following files to the root of your Gotek USB flash drive
- HXCSDFE.CFG from \flashfloppy-v2.14\HxC_Compat_Mode
- \flashfloppy-v2.14\HxC_Compat_Mode\Amiga\AUTOBOOT.HFE
The drive should look like this
That’s it! All you’re missing is the game “ROMs” or ADF files.
Downloading Games
Before we talk about downloading games – the legal bit. We / I “Retro32.com are not responsible for any downloads/links or anything else on this site. It’s YOUR responsibility to ensure that you are only downloading/using game backup files of titles you already own.
So, with that out of the way. A complete “dump” of all Amiga games is available from https://archive.org/details/Commodore_Amiga_TOSEC_2012_04_10
The file is 31.5GB so we recommend using a torrent client like uTorrent to download the file. Again, you do this at your own risk. The TOSEC file itself if bigger than a 32GB flash drive without unpacking all the files. We recommend a 64GB usb stick to future proof you ADF collection.
There are also a number of other resources available for you to download your games from. A search / bing for Amiga ADF files or similar should see you in the right direction.
**Update 5/4/2020**
Since publishing this article we’ve been made aware of a new version of the TOSEC archive which has been sorted alphabetically in folders and cleaned. This can be downloaded using the following links https://1drv.ms/u/s!AgN_lcJFiQVialvp4do3sMi9_7k?e=C4IPvE & https://mega.nz/file/MR5gDSxB#n6pCWfb9Q4ps2RSoJDfAe92j9BHz4Jip5lD6-jFwBaw
Be sure to check out our recent article covering this be finding – https://www.retro32.com/gaming/amiga/05042020561-amiga-adf-tosec-amiga-game-download-sorted-cleaned
Amiga EAB
Be sure to check out the Amiga EAB google drive which contains a whole host of downloads for Commodore platforms. Access it using this link – (Thanks to Cory for the updated address)
https://drive.google.com/drive/folders/1j10Yh1Pr7K7SCPZF_Y9EebUyPyceqang
Putting Amiga Games / Software onto your FlashFloppy USB Drive
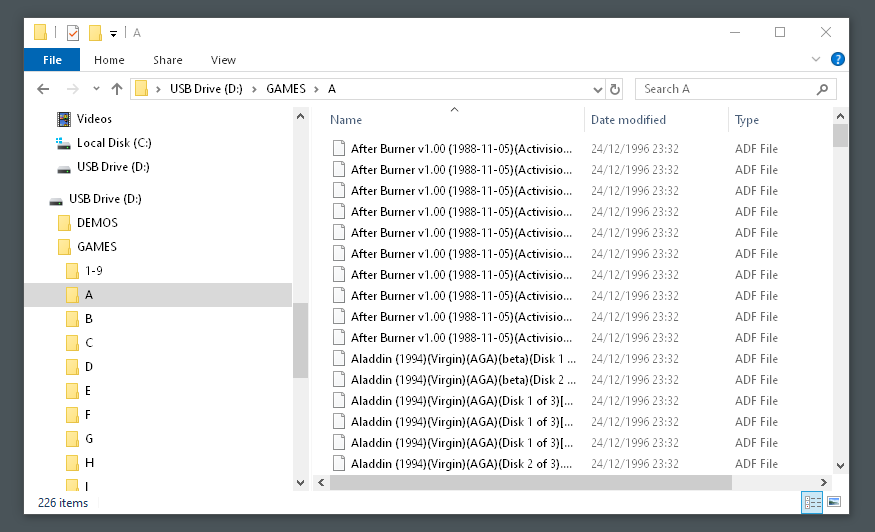
Putting the files onto your drive is a simple drag and drop affair. We’d recommend that you take the time to create a nice file structure so you can find your games, programs and utilities easily.
Don’t want the hassle of finding and loading your GOTEK USB Drive?
We know your time is precious and you’d rather be playing your belove Amiga rather than hunting down, organising and loading games, utilities and demos onto a flash drive. Why not let us do the hard work for you with our preloaded Retro32 Amiga GOTEK flash drive. It includes over 13,000 ADF files. Check it our and order yours today in our shop –
How to use your Gotek
Pop the USB stick into your Gotek Drive, turn on your trusty friend and it will boot to the FlashFloppy Selector.
We’ve put together a short video of how to assign the ADF images to the Gotek slots as well as the settings menus.
Let’s hear from you!
As I said in the into, we’re still learning this stuff. Let us know if there’s something we missed or got wrong. Also let us know if this guide helped you – leave a comment below.
We’d like to also give a little nod to Jean-françois Del Nero from the Commodore Amiga Facebook group who pointed out a MASSIVE mistake on the page. We salute you Sir.
Our other Amiga Articles
As well as all the game videos we’ve been pumping out recently, we’ve also got a number of other Amiga guides. Check out the links below
- AMIGA GOTEK: GETTING STARTED GUIDE | INSTALLATION | SET UP AND GAME DOWNLOADS (FLASHFLOPPY)
- AMIGA 500 RASPBERRY PI BUILD: THE “PIMIGA” – HARDWARE BUILD
- COMMODORE AMIGA 500 BUYERS GUIDE
- WHY YOU SHOULD RECAP YOUR AMIGA – AMIGA RECAPPING FAQ
- AMIGA MEAN WELL POWER SUPPLY UPGRADE RT-50B / RT-65B
- HOW TO EMULATE AN AMIGA IN WINDOWS (WINUAE GUIDE)
- AMIGA 500 RASPBERRY PI BUILD: THE “PIMIGA” – HARDWARE BUILD
- AMIGA 1200 8MB FAST RAM BOARD. SYSINFO COMPARISON A1200 VS A1208
- AMIGA ADF TOSEC AMIGA GAME DOWNLOAD – SORTED & CLEANED (GOTEK) – [CONTENTS / GAMES LIST]
- AMIGA PUBLIC DOMAIN PD GAMES DOWNLOAD PACK ADF
- HOW TO CONNECT YOUR AMIGA TO A MODERN TV / CAPTURE CARD – RGB SCART TO HDMI (NOT COMPOSITE)
- AMIGA ADF TOSEC AMIGA GAME DOWNLOAD – SORTED & CLEANED (GOTEK)
- AMIGA GOTEK: GETTING STARTED GUIDE | INSTALLATION | SET UP AND GAME DOWNLOADS (FLASHFLOPPY)
- COMMODORE AMIGA 1200 BUYERS GUIDE
- AMIGA CD32 GAMES ISO DOWNLOAD & HOW TO BURN
- COMMODORE AMIGA 600 BUYERS GUIDE
- HOW TO OPEN AN AMIGA 600 CASE
I bought a Gotek drive about five years ago, then at some stage I stopped using it. My USB stick filing system stopped working. I forgot which file enabled it to work. I heard there were two types of these files depending on which type of Gotek drive you had, but I didn’t know which type I had. I’ve just reformatted a USB stick I wasn’t using as FAT32, installed the two files you said from a previous version and the USB stcik didn’t enable the Gotek to boot up with its menu. The red LED display shows three dashes instead of any number. The green light on the front comes on, but the red light doesn’t come on. After this, I tried downloading the latest version of the Flash Floppy software, then deleted the older version files and copy the later version files onto it. This made no difference at all. Do you know what’s the matter with my Gotek drive or USB stick?
Hi Paul
The file system needs to be FAT32 for the drive to read it. I had this with one of my drives recently.
Cheers Karl
Hi, i have 1 gotek drive for my A1200. Works great. I have another A1200 with original disk drive in it, can I swap my Gotek drive out off my A1200 n install it into my other A1200 with the same Gotek drive?
Hi Kevin
Yep – you can move it. The actual configuration for the GOTEK is stored in on the drive.
Cheers Karl
So how do you load workbench if you don’t have a floppy drive any more?
Hi Clark
You can simply use a Workbench ADF image to boot to it 🙂 – Or if you’ve got a PiStorm you can just boot straight to WB from the hard drive image installed on it :
Cheers Karl
Hello,
Maybe you can help me, I installed an Amiga 2000 compatible Gotek
with at the root the file AUTOBOOT.HFE and HXCSDFE.CFG, FlashFloppy this launches
but there is “error: writessector- failure while seeking the track 00!”,
can you help me.
Sincerely yours.
Hi, the Gotek works just fine. However, I have a lot of junk on my usb stick and can’t get rid of it. I try a different usb stick and the same stuff shows up. How do I clear the gotek or clear slots. Thanks a lot.
Hi Clark
The image slots should be kept on the flash drive so that’s a little odd. The easiest way to do it is to select an ADF then use the delete key in the slot selection to remove the entries.
Hope that helps.
Cheers Karl
Thanks–I may be mistaken, so I will try it again.
Just installed a gotek in my A500 Rock Lobster box with this guide, runs like a dream, thanks
Amiga EAB Google Drive has apparently moved to https://drive.google.com/drive/folders/1j10Yh1Pr7K7SCPZF_Y9EebUyPyceqang
Thanks Cory! I’ve updated the article. Much appreciated
Hi I haven’t used my A1200 for some time and when I do I get a insert floppy screen and the oled display on the hotel reeds F-F and if I push right button reads 0 then 12 then back to F-F
I installed a PiStorm on my Amiga 500 and I can’t use my Gotek. I start the Amiga using Gotek with UtilitiesToKillYourA1200, I select a game and when I press F10 to restart the computer and run the game it starts using the PiStorm SD Card and does not identify Gotek. How do I get PiStorm to recognize Gotek?
Hi i had my ff setup working awesome but had not used my amiga in a while now all my game folders are not in alphabetic order is there a way to fix this?
Hi I just bought an Amiga 500 with an older Gotek (no OLED, RED LED that shows disk number and 2 buttons. I realized there was no way to save games and found my way to your site. Will the flash floppy procedure above work on my version? Thanks, Charlie
Only thing I’d like with the Gotek is to be able to boot from hard drive, and run a program that looks on the USB at what images are on there and lets me mount one without having to peer though the tiny floppy drive slot and fumble with the buttons. If I can boot to an autoboot image to select disk images and put them in slots, why can’t I do this from Workbench and mount an image to df0? There’s clearly a mechanism to read the contents of the USB drive somehow. Granted I’d still have to do the fumble with multi disk games but usually those are installed with WHDLoad anyway.